Showing posts with label cake pops. Show all posts

Tuesday, November 20, 2012

Royal Icing Mustache for Movember

Today's post is a tribute to all the guys growing mustaches in November to commemorate Movember, an annual, international effort to raise awareness of prostate cancer. This post is also, of course, a tribute to all the guys having to deal firsthand with this dreadful disease. I swear, once this tiny icing mustache is dry enough tp peel off the parchment, I'll post a shot of me with it stuck to my face. All you'll need to pipe iconic handlebar mustaches to decorate cupcakes, brownies, cake pops, whatever, for Movember are stiff consistency royal icing in any color (but black is particularly fetching), a round #10 tip, a flower nail, parchment paper squares, a Styrofoam block to rest the nail in, a glue sick, and a dusting pouch filled with a 50/50 mix of cornstarch and powdered sugar. Start by sticking a parchment square to the flower nail with a dab from the glue stick. 
Hold the tip just above and at a right angle to the surface. Squeeze while moving the tip in an S shape. Increase pressure during the first curve, and decrease pressure as you continue through the second curve. 
I found it easier to make the sides even by piping the other side upside down. Rotate the nail, and pipe the other half. Overlap the second half slightly, and gently tap down the center with a fingertip after touching it to the dusting pouch. You could probably stick a toothpick into the icing when it's wet to serve as a handle or cupcake pick (I haven't actually tried this myself, but there's really no reason it wouldn't work if it's properly embedded and the icing is allowed to dry completely). 

Wednesday, July 25, 2012

Royal Icing Lipsticks

Girly-girl cakes are quite the rage, and invariably seem to feature life-size lipsticks crafted out of fondant. I wanted to try piping teeny-tiny cupcake-sized lipsticks out of royal icing; as you can see, there's not much to them. All you need is stiff consistency royal icing in black and whatever lipstick color you'd like, round tips #12 and #10, parchment paper squares, an offset spatula, a dusting pouch filled with a 50/50 mix of powdered sugar and cornstarch, a flower nail, glue stick, and Styrofoam block to rest the nail in (or just pipe directly on the parchment paper squares on any flat surface like your countertop). Start by sticking a parchment square to the glue stick with a dab from the glue stick. 
 Pipe a #12 cylinder of black icing about 3/4" long; keep the tip almost flat against the surface. Tap the offset spatula against the dusting pouch, and use it to flatten both ends.
 Pipe a cylinder for each lipstick tube.
 Pipe the lipstick itself with the #10 tip. Butt the tip against one end of the black cylinder, squeeze out about 1/4", then angle the tip to a 45 degree angle…
 …then slide your dusted angled spatula in between the tip and the icing and pull the tip away.
Remove the spatula before the icing has too much of a chance to cling to it. Touch a fingertip to the dusting pouch and neaten the tip so it has that iconic, chiseled shape. 
 You'll probably also want to pipe some royal icing eyeshadow (perfect for any girly-girl cupcake, cake pop, petits-fours; any tiny dessert that needs something just cute perched on top).

Friday, May 18, 2012

Cornelli Lace

The mere mention of cornelli lace causes my hands to twitch with the anticipation of the onset of carpal tunnel syndrome. I've always liked the look of the technique, but can't imagine piping a whole cake with it; cornelli lace, according to the Wilton publication Decorating Cakes: A Reference & Idea Book, is a standby for more formal cakes, like wedding and anniversary. As with many techniques, it's a good idea to do a trial run on a practice board. Load a piping bag with thin consistency icing (I used royal icing) and a round #1 or #2 tip (I used #2). Hold the tip at a 90 degree angle to and just above the surface; you don't want the edge of the tip to carve into the icing or scrape the cake. Keep the tip moving constantly and randomly; you don't want to hold still to take a photo like I did here (see how the icing, being thinned, kept flowing and formed a bead when I held the tip still for just a couple seconds):
 I think Nilla Wafers are great for practicing on. With cornelli lace, the ends should start and end at the edge of the surface you're covering.
Don't end in the middle like I did with this first trial:
 
The trick is to be as random as possible; pipe a continuous, squiggly string that never crosses over or touches itself. 
 Continue until the entire surface is covered.
Cornelli lace is also a good technique for cake pops; just make sure the ends begin and end at the stick. You can use royal icing or melted chocolate. A pop like this can be piped in under a minute; the cornelli lace really dresses it up!

Wednesday, May 9, 2012

Brownie Pops

I recently took Wilton's 2-session Cake Pops class, during which brownie pops were briefly mentioned. I just made a batch, and haven't had a chance yet to decorate (or even taste) them, but already I'm pretty sure of one thing: I'm going to prefer the consistency of these over cake pops significantly. You can make 24 brownie pops from one 8x8" brownie mix, supposedly; that's what the Wilton site claims. I made 16, but I think I may have filled the pans a bit deeper than I should have; next time, I'll try for 24 and not fill the pans as high. Here's what you'll need, if you're making them from a box mix (which you'll follow the directions on):
 I used Pillsbury's Chocolate Extreme brownie mix, which has massive chunks of chocolate AND…
…a pouch of dark chocolate syrup. Just, YUM. The only items you might not have immediately on hand are the Brownie Pops 8-Cavity Silicone Mold and Cookie Sticks (both easy to find in any cake decorating section of a craft store or at cake supply stores; strangely, I found the pan, er, mold, at an Ace Hardware).  
 Make sure the pan is clean and dry, then spray it with non-stick cooking spray. Place the pan on a cookie sheet…
 …and fill each of the wells 2/3 full (this is how I interpreted 2/3, which as you know wound up being too generous).
Place the brownie pops in the oven (use whatever temperature your recipe calls for), and after 15 minutes, insert the sticks. Return them to the oven for another 10 to 15 minutes (10 was sufficient for mine). When the time is up, remove the pan from the oven (keep it on the cookie sheet), and allow it to cool completely. Note to self: those sticks will be blazing hot. 
 When the pops are cool, they should slide right out of the wells. Lay the pan on its side, and gently press on the bottom of each well.
 I'm still trying to figure out what sort of embellishment these pops will have; stay tuned!

Saturday, May 5, 2012

Flat Flowers on Cake Pops

Continuing along with cake pops, I adapted Buddy Valastro's method of piping flat flowers on cupcakes (you can find it in the book Baking With the Cake Boss). The procedure is similar, but with a few changes (I sure don't want to be accused of ripping off Buddy!). First, make some flat cake pops; this one was made with the Rick Krispy Pops recipe, but you could also mold the basic cake ball pops into a flattened shape. You'll need medium consistency royal icing in three colors of your choosing (but you'll probably want to choose green for the leaves unless you're feeling rebellious). In this case, I put a round tip #12 on the yellow bag for the center, a #69 leaf tip on the green bag, and a #104 petal tip on the pink bag. 
 Start by piping a dot in the middle of the pop to keep you "centered."
 Lie the petal tip almost flat on the pop, with the wide end resting on the center.
 While squeezing, move your hand in a tight upside down "U" formation to form the petal. Bring the tip right back to where you started. If you need to coax the petal into a more pleasing shape, keep a dusting pouch filled with a 50/50 mix of powdered sugar and cornstarch handy, touch your finger to it, and gently tap the petal into place.
 Continue until you've covered the pop's surface with petals.
 Pipe the center by holding the round tip just above and perpendicular to the center. Squeeze steadily until the center builds up to the diameter you want, stop pressure, then pull the tip away. If a peak forms, tap it down with your fingertip.
 You could leave it like this…
 …or pipe a few leaves around the edge by tucking the leaf tip under two adjacent petals, squeezing, and pulling away. Pinch the tip of the leaf to a perfect point with your fingertips, if need be. When the icing is dry, store the pops in a cardboard box between layers of waxed paper (not a sealed plastic box or Ziploc; any trapped moisture is bad for the icing) until ready to serve.

Tuesday, May 1, 2012

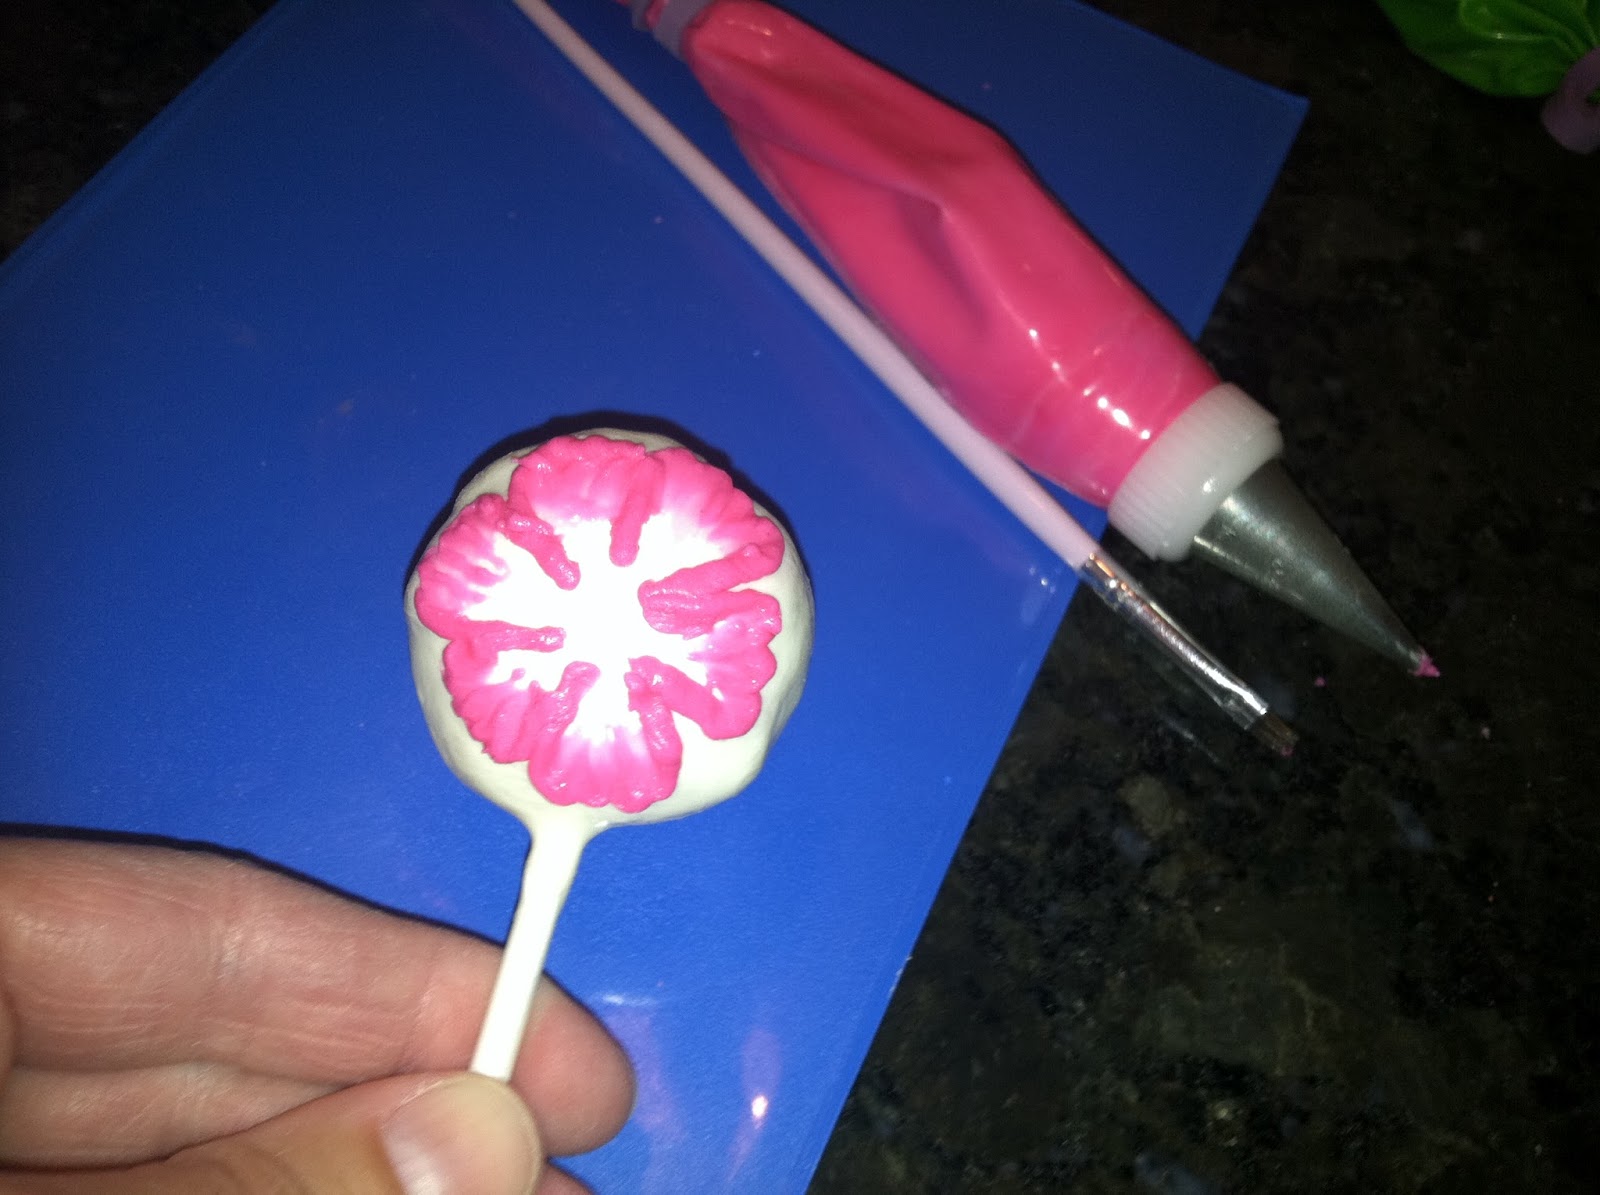
Brush Embroidery on Cake Pops

As you can imagine, brush embroidery (also known as brushed embroidery) on cake pops is pretty much the same thing as on a standard cake, but you have (presumably) significantly less real estate to work on. This also means you can knock these pops out pretty quickly, once you hit your stride. Here's what you'll need…
…cake pops (any shape; I used round, but I think flat might be a better choice), a Styrofoam block to stick the pops in to dry, royal icing in any color in bags fitted with round #2 tips (you could also use melted candy), a cup of water, paper towels, a practice board (if you want to try your hand at brush embroidery someplace other than on the pop itself), and a brush like this:
 That's the short, squared-off brush from Wilton's 3-brush set. It has just the right amount of stiffness to successfully do brush embroidery. Get the brush ready to go before you start piping; dip it in the water, and blot most of it off on the paper towel. Do this before piping each petal. To pipe a basic flower, start by piping the outline of a petal…
 …and gently drag the icing from the outline in toward the center. Experiment with the wide and narrow sides of the brush tip to see what you like best.
 To make a flower with six petals, I like to pipe three of them first, more or less evenly spaced. Remember, work petal by petal; once the icing has started to dry the brush embroidery technique won't work. When you clean off and moisten the brush in between petals, make sure it isn't dripping; the excess water will bead up on the chocolate's surface and drive you bonkers. Wipe the brush almost dry on the paper towel.
 Then, I piped another three in between these first three. The spacing in between the petals isn't perfect, but 1) neither are real flowers, 2) the end result will look truly hand-drawn and not knocked-out of a cookie cutter, and 3) that gap will lend itself to a design element shortly.
 You may want to pipe a center. This is a tightly-piped cluster of #2 dots.
 That gap between petals is the perfect place to pipe a stem. I vibrated the tip in and out as I piped to make the stem appear "stitched."
 I added a leaf, which was too small to truly do the embroidery technique on, but I was able to soften the outline with the brush a bit, and to gently blend the leaf into the stem.
 Lastly, I piped a few yellow stamens in the center.
 And there you have it; one of an infinite number of ways to do brush embroidery on a cake pop!

Saturday, April 28, 2012

Basic Cake Ball Pop Recipe

Making cake pops in the basic ball shape is one of the easiest things you can do; it would appear that decorating them is where the potential exists to lose your mind! For the pop itself, the only things you need are cake and icing (of the creamy variety). These are the tops off three 6" cakes that I leveled (a standard box of cake mix fills three 6" pans perfectly). 
You'll also need a cookie sheet lined with waxed paper or parchment paper. 
Make sure your hands are extremely clean, and start by breaking up the cake into tiny pieces; no large chunks should remain.
Now, stir in some frosting. It seems most cake pop recipes recommend more frosting than is necessary. You can always start with a small amount and add more as needed. If you start with too much frosting and wind up with a creamy mess you can't form into balls, the only solution would be to add more cake. I used maybe two small spatula dips worth of frosting for this project.
 Stir it around as best you can, but if you're like me you'll eventually abandon the spatula and use your hands. I heard this concoction referred to as a "slurry" of frosting and cake, which is pretty accurate.
 Scoop out some of the mixture; one, two, or three tablespoonfuls, depending on what size pops you're going for. I used two.
 After squeezing the mixture tightly and rolling it between my hands, here's the first ball. It should be firm and dense; not at all likely to fall apart at the slightest provocation. Remember, it needs to hold up to having a stick shoved into it, and to being dunked in melted candy or chocolate. Make it solid!
 Place the balls on the cookie sheet, and then chill them in the refrigerator for about two hours.
Before you remove the balls from the fridge, get ready for the next step: coating them and decorating them. I'm only dipping these in chocolate and covering them with toffee chips, so I picked up a bag of Heath English Toffee Bits (you can find these near the chocolate chips on the baking aisle), and I melted half a bag of Guittard Melt N' Mold pieces (melt in the microwave; stir after :30 increments until smooth). The only other items needed are a Styrofoam block and lollipop sticks (from the candy/cake decorating aisle at the craft store). 
Dip a stick in the melted chocolate…
…and push it straight into the pop. Cover your finger over the opposite end; you'll feel the stick coming and will know when to stop pushing (you don't want the stick to come out the other side). 
When the chocolate at the base of the stick is dry, the pop is ready to be dipped in the chocolate. 
Make sure the edge of the container holding the chocolate is clean. 
Dip the pop in at an angle to just over where the stick meets the cake; this will help anchor the cake to the stick. 
Tap the stick against the edge of the container to shake off the excess chocolate. Don't take too long doing this step; the cold of the pop will cause the chocolate to start hardening rapidly.
Sprinkle the toffee bits (or whatever topping you're using) over the pop until it's thoroughly coated. 
Push the stick into the Styrofoam block. Don't chill these particular pops in the refrigerator; toffee bits have a tendency to get gummy. However, at this point with most pops you would want to chill them in the fridge for about 10 minutes (no longer or the cake will shrink and the chocolate will crack). 
Wrap the pops in plastic wrap, or any sort of lollipop sleeve (available in the same part of the store where you found the sticks). Store (hoard?) them in a cool place until ready to serve, give away, or keep for yourself.