Showing posts with label tip #69. Show all posts

Tuesday, November 13, 2012

Royal Icing Sycamore Leaf

Sycamore trees can produce enormous leaves; up to 15" across! I should know, because when I was growing up I had to rake an awful lot of them this time of year. All you'll need to pipe tiny versions about one-fifteenth this size are stiff consistency royal icing in any muted fall color (especially brown, gold or green), leaf tip #69, oval tip #55, a flower nail, a Styrofoam brick to rest the nail in, parchment paper squares, a glue stick, a dusting pouch filled with a 50/50 mix of cornstarch and powdered sugar, and round toothpicks. Start by sticking a parchment square to the flower nail with a dab from the glue stick. 
 Pipe a line about 1" long with the #55 tip.
 Switch to the #69 tip and, holding the tip at about a 45 degree angle, pipe three shots of icing for the leaf. The "spine" of each leaf should radiate out from the stem. Pipe the center piece first, and then the sides. Taper the tips with your fingertips after touching them to the dusting pouch.
 Press the toothpick into the icing around the edges (but not the tips) and draw it outward to create an approximation of the texture of sycamore leaves. Pipe several hundred of them if you want to recreate the real deal, or pipe a few dozen to dress up a festive fall cake.

Thursday, November 8, 2012

Royal Icing Peapod

I was reading about the first Thanksgiving and was surprised to find that peas were supposedly on the menu; they don't get nearly the amount of historical credit that pumpkins and maize do. All you need to pipe a sweet little peapod are stiff consistency royal icing (I used Avocado by AmeriColor; a color I haven't used since I made those gum paste artichokes), round tip #12, leaf tip #69, tip #61 by Bakery Crafts (a teardrop shaped tip used primarily for piping violets), a flower nail, a Styrofoam block to rest the nail in, parchment paper squares, a glue stick, and a dusting pouch filled with a 50/50 mix of powdered sugar and cornstarch. Start by sticking a parchment square to the flower nail with a dab from the glue stick. 
 Hold the tip at a right angle and against the surface, and pipe a gently curved shape to form half of the peapod.
Here's another view of it. 
 Repeat to form the other half.
 Pipe as many peas in whichever size you wish. I was able to fit three peas with tip #12. Hold the tip just above and at a right angle to the center line, squeeze briefly, and pull up and away while stopping pressure.
 Touch a fingertip to the dusting pouch and tap the peaks down into balls.
 You could stop here or add a leaf or two if you like; make sure they're firmly anchored to the pod. I used a #69 leaf tip. I think these would be sweet cupcake toppers for a baby shower in anticipation of multiple births; tiny faces could be drawn on with food-safe markers like AmeriColor Gourmet Writers, and the peas could be piped in whatever skin tone you like.

Tuesday, July 24, 2012

Royal Icing Ivy

It's been a while since I piped something plant-related (what can I say, I prefer critters and hats). It's also been a while since I piped a truly simple project involving only one tip: leaf tip #69 (or any size you prefer). You'll also need a dusting pouch filled with a 50/50 blend of cornstarch and powdered sugar, a glue stick, parchment paper squares, a flower nail, and a Styrofoam block to rest the nail in. Start by sticking a parchment square to the flower nail with a dab from the glue stick. 
 Hold the leaf tip almost flat against the surface, and squeeze out a leaf while jiggling the tip in a gentle in-and-out sawing motion to create "veins." If need be, touch the dusting pouch with your thumb and index fingertip and pinch the tip to perfect it. I sometimes use the surface of my fingernail to create that inward curve on each side of the tip.
 Pipe two smaller side leaves in a similar fashion.
 Angle the side leaves so the base of the entire shape looks like the top two curves of a heart (or a rounded "W", if you prefer).
 Make sure the leaves don't look identical to each other to add to the realism.
When you place them on a cake, you may want to pipe vines first, perhaps with a round #3 tip. This is a cake from an earlier project:
Of course, you could pipe ivy leaves in black or dark purple to be totally goth. 

Saturday, May 5, 2012

Flat Flowers on Cake Pops

Continuing along with cake pops, I adapted Buddy Valastro's method of piping flat flowers on cupcakes (you can find it in the book Baking With the Cake Boss). The procedure is similar, but with a few changes (I sure don't want to be accused of ripping off Buddy!). First, make some flat cake pops; this one was made with the Rick Krispy Pops recipe, but you could also mold the basic cake ball pops into a flattened shape. You'll need medium consistency royal icing in three colors of your choosing (but you'll probably want to choose green for the leaves unless you're feeling rebellious). In this case, I put a round tip #12 on the yellow bag for the center, a #69 leaf tip on the green bag, and a #104 petal tip on the pink bag. 
 Start by piping a dot in the middle of the pop to keep you "centered."
 Lie the petal tip almost flat on the pop, with the wide end resting on the center.
 While squeezing, move your hand in a tight upside down "U" formation to form the petal. Bring the tip right back to where you started. If you need to coax the petal into a more pleasing shape, keep a dusting pouch filled with a 50/50 mix of powdered sugar and cornstarch handy, touch your finger to it, and gently tap the petal into place.
 Continue until you've covered the pop's surface with petals.
 Pipe the center by holding the round tip just above and perpendicular to the center. Squeeze steadily until the center builds up to the diameter you want, stop pressure, then pull the tip away. If a peak forms, tap it down with your fingertip.
 You could leave it like this…
 …or pipe a few leaves around the edge by tucking the leaf tip under two adjacent petals, squeezing, and pulling away. Pinch the tip of the leaf to a perfect point with your fingertips, if need be. When the icing is dry, store the pops in a cardboard box between layers of waxed paper (not a sealed plastic box or Ziploc; any trapped moisture is bad for the icing) until ready to serve.

Sunday, March 11, 2012

Attaching Stems to Royal Icing Flowers

If the products on display in 99.9% of all bakeries are any indication, there's nothing else to do with royal icing flowers other than squish them into a swirl of buttercream icing atop a cupcake. With a few extra steps, you can easily elevate royal icing flowers to new heights by adding stems (and leaves!) to them. In addition to pre-made royal icing flowers (in this case daisies; perfect on cakes honoring the 100th birthday of Girl Scouts of the USA, as they're the official flower), here's what you'll need: 
 Parchment paper squares, florist's tape, scissors, needle-nose pliers (the kind used in jewelry-making), a Styrofoam block, 20-gauge florist's wire for the stem, 26-gauge wire for leaves, stiff-consistency green royal icing in a pastry bag fitted with a coupler and a round tip #8, a small brush, and a leaf tip, if you're making leaves (I used an Ateco tip #69). Start by cutting off about 6" of florist's tape, if you're wrapping a 4" 20-gauge wire for the stem:
 Pull the tape at one end gently to activate the adhesive; it will turn a lighter shade of green when it's sticky:
 Wrap the whole wire, pulling the tape as you go so it will stick to itself the length of the wire. Trim off any excess.
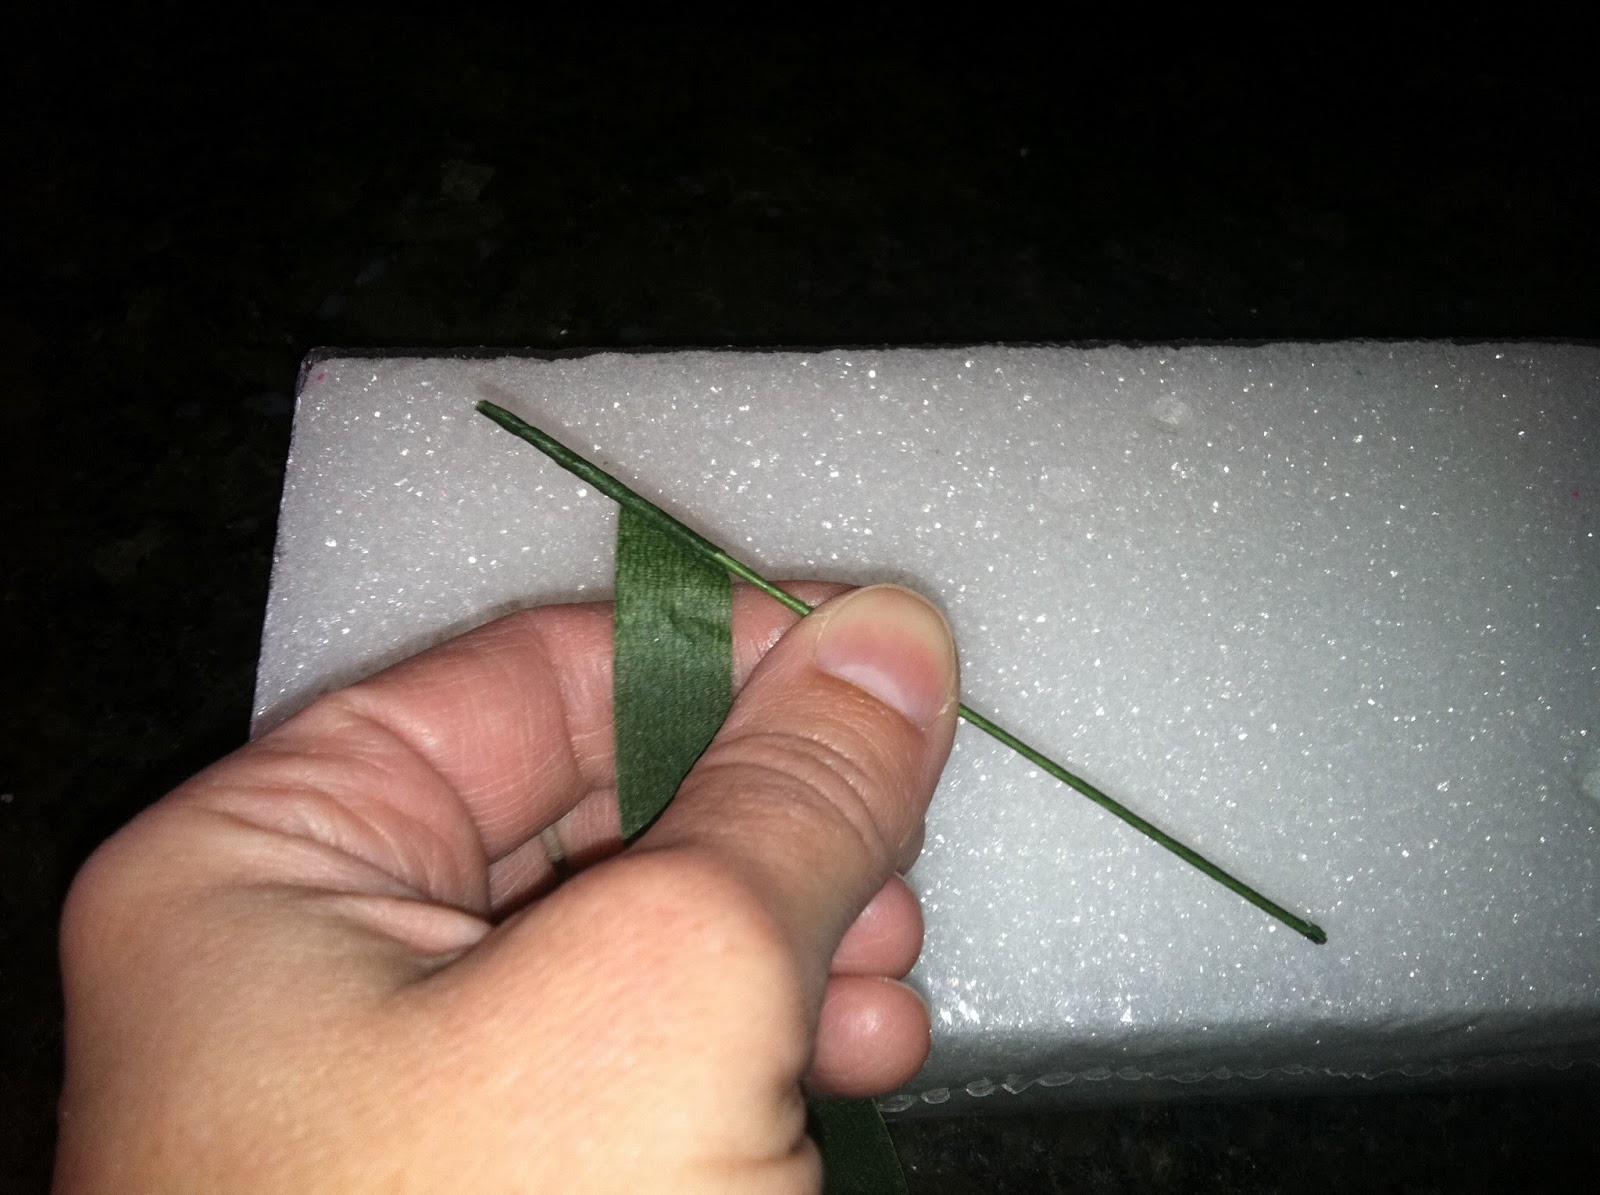
 Use your pliers to bend one end into a hook; a little less than a quarter-inch.
 Pipe a penny-sized ball of icing on a parchment paper square. Hold the bag perpendicular to and just above the surface of the square. Keep it buried in the icing as it builds up, stop the pressure when it's about half an inch high, and pull the tip away. It will look a bit like a Hershey's Kiss:
 Stick the hooked end of the wire in the middle…
 …and use the brush to gently smooth the icing a little way up the stem.
 It was at this point I realized my green icing wasn't stiff enough to do the next step: stick the wire stem into the Styrofoam block and allow the icing to dry. So I had to improvise by using some clear tape to brace the stem straight up along the side of the block. I'm glad I never took off the plastic wrap!
 To make leaves, wrap two small wires in florist's tape and make tiny hooks at one end with the needle-nose pliers:
 Pipe dabs of icing in the centers of parchment paper squares and lie the wires down with the hooks in the icing:
 Change the tip on your pastry bag of green icing to the leaf tip, and pipe leaves over the hooks. Set them aside to dry.
 I let my leaves and the base dry for about five hours. Then I wrapped the leaves to the stem, each with their own piece of florist's tape (don't try to wrap both leaves with one piece of tape; the end result won't be as stable):

 Pipe a #8 bead of icing on the underside of the flower you're going to mount to the stem. Use green or whatever color the flower is:
 Gently press the flower onto the bead of icing on the stem. Allow it to dry for a couple of hours.
 Remember, you can't stick florist's wire or tape directly into cakes; next time you're someplace that has those tiny coffee stirrer straws, grab a supply (The Iced Queen does not generally condone theft, mind you). Stick the straw into the cupcake, cake, whatever, and insert the flower stem into it. Use larger straws if you're grouping several flowers together. From all the horrific accounts I've read on the dangers of florist's wire and tape, the deal is the wire contains lead, and the tape contains latex, which can leach out into the icing and cause anaphylactic shock in latex-sensitive individuals. What a way to end a party! I've never heard of this actually happening, but with my luck it would be at my house. You might be wondering if the flower is still safe to eat after being mounted on a wire-and-tape stem. I think it would be, because it never actually comes into contact with either of these items; by the time it's mounted by the bead of icing to the green base containing the wire, the base is dry. Personally, I would hope the cake it's rooted in has such a generous supply of icing that it never enters anybody's head to eat the decorations, but you know…you can never have too much icing.

Saturday, March 10, 2012

Royal Icing Tiger Lily

When I first bought the massive Wilton Ultimate Decorating Set, there was one tool I couldn't begin to imagine the function of:
It wasn't until I was in the Course 2: Flowers and Cake Design class that I learned the above is a 2-piece lily nail. The piece on the left is the top, the piece on the right is the bottom. To make tiger lilies, you'll need the following…
…the lily nail, foil squares (you could use aluminum foil, but I like the thin foil sold in the candy section; it conforms well to the inside of the nail), scissors, brown stamens (sadly, the one inedible part of this project, but they could be left out or plucked out), a small brush, a brown food-safe marker, a Styrofoam block (your third hand), orange royal icing in a bag with a #69  leaf tip (this tip is made by Ateco; Wilton makes something similar), and yellow royal icing in a bag with a #14 star tip. Start by pressing the foil snugly over the top of the lily nail:
 Cover it with the bottom half of the nail…
 And wrap the excess foil around the bottom half's edge.
 Remove the top half and this is what you're left with:
 Start by piping a triad of petals. Put the tip of the orange bag in the center, and squeeze gently as you slowly draw the tip up to the edge, decreasing pressure as you go. Don't squeeze too hard at the beginning, or the "cup" of the flower will fill up with icing that will take FOREVER to dry.
 Pipe three more petals in between these three for a total of six. Set the lily in a hole in the Styrofoam block to begin drying.
 Note that the bunch of stamens is wrapped in the center with tape.
 Cut the bunch of stamens in half right in the center of the tape. Discard the lower half (or come up with a clever way to recycle them).
 When the flower has had a chance to firm up a bit, pipe a small yellow star in the center:

 Use your brush to gently turn the star into the yellow center of the flower by stroking it up the petals.
Insert the bunch of stamens into the center, and allow it to dry. Gently untuck the foil from the edges of the lily nail's bottom half, and set the flower aside to dry in a warm, dry place (I usually leave icing flowers that are still firming up on my stovetop under the hood's overhead light; I'd move them if I was operating the stove, of course). These flowers need to be made far in advance, because the drying time can take several days. You don't want to peel the foil away too soon! Needless to say, these can be made in any color imaginable to coordinate to your cake or event. If you'd like to see a tiger lily made out of gum paste, click here