Showing posts with label tip #2. Show all posts

Sunday, December 9, 2012

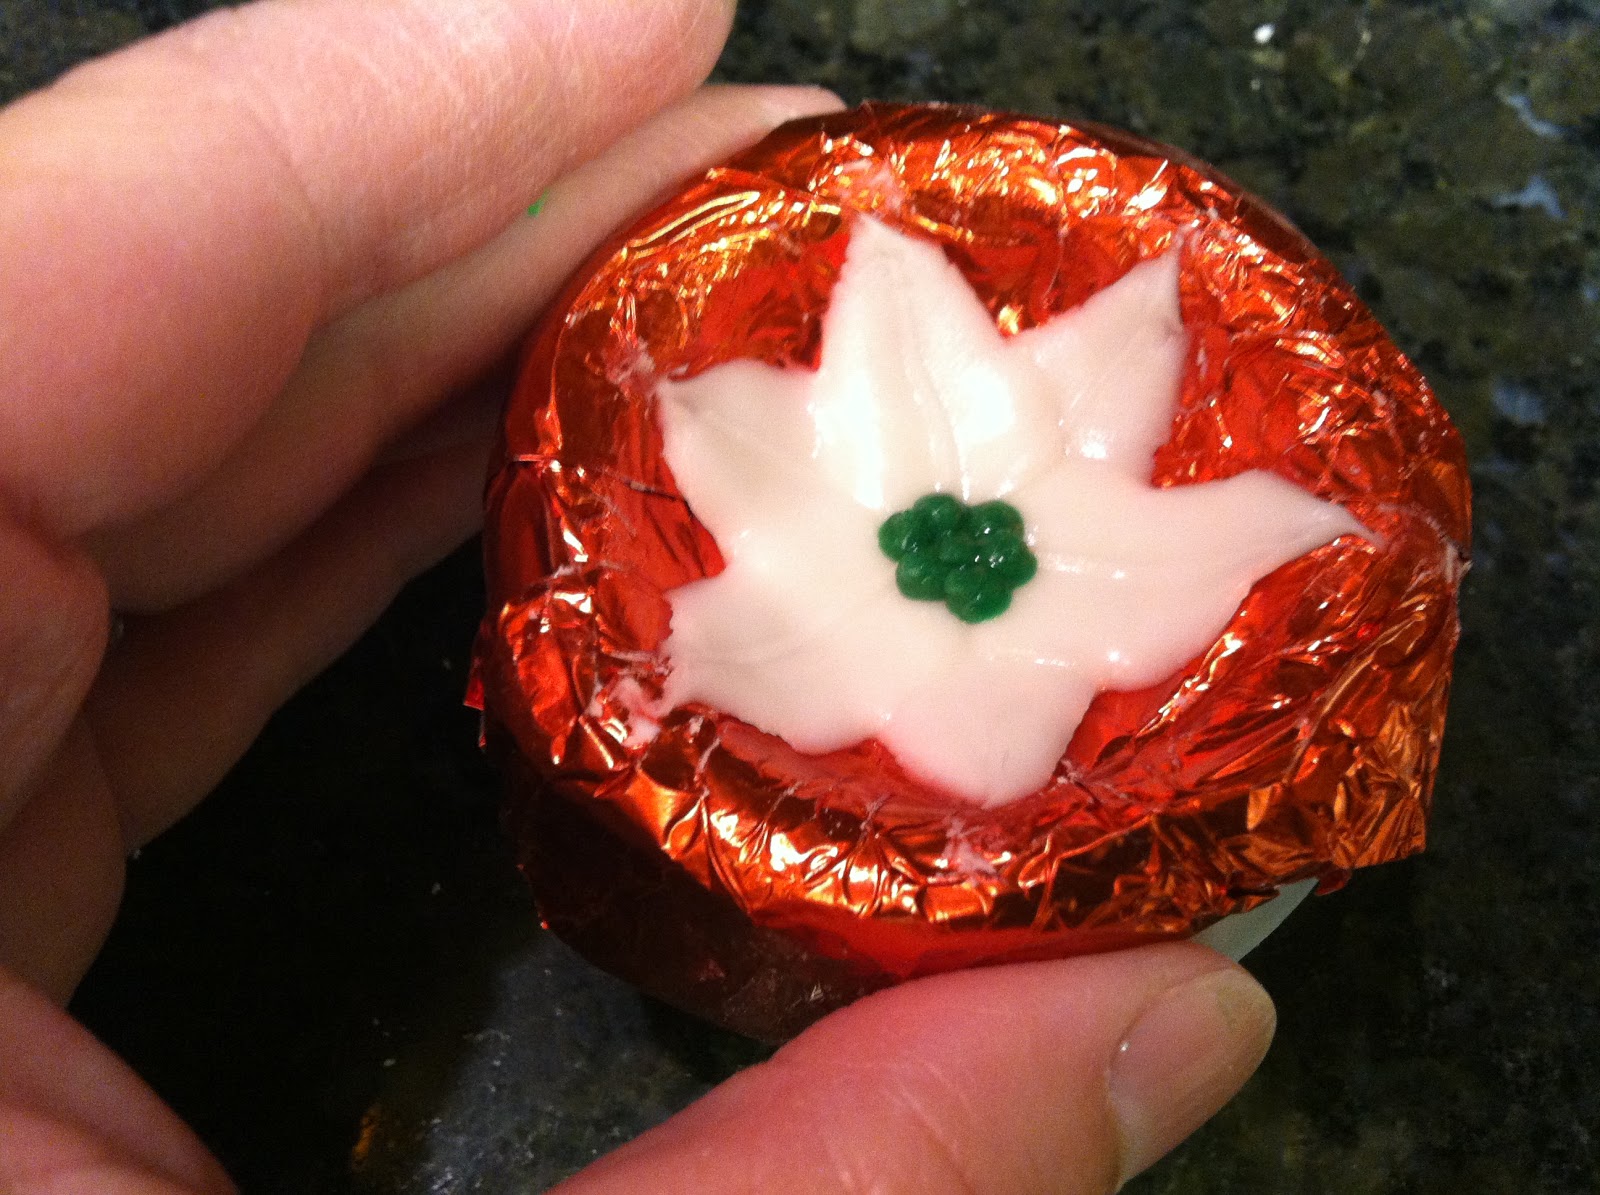
Royal Icing Poinsettia

Poinsettias are very easy to pipe, but they take a long time to dry; make sure to plan ahead if you're going to use them to decorate a cake for Christmas! You'll need stiff consistency royal icing in green, yellow, red or white, leaf tip #70, round tips #2 and #3, and a dusting pouch filled with a 50/50 mix of powdered sugar and cornstarch. You'll also need a small flower forming cup and a square of candy foil for each poinsettia. 
 Line the cup with the foil and tuck it around underneath.
 Attach the #70 tip to the white or red icing. Hold the tip in the center and squeeze out a petal.Touch your fingertips to the dusting pouch and taper the tip of the petal.
 Repeat several times to make the flower. I like to start by piping three equilateral petals. Try not to pipe an excessive amount of icing in the center or it will take a week to dry, depending on your climate.
 Six petals or so is a good number.
 Pipe a cluster of green dots in the center with the #3 tip.
 Allow the green dots to dry for a few minutes, then top each one with a dot of yellow piped from the #2 tip. You can gently remove the flower on the foil from the cup so you can use the cup to pipe more flowers. Set the foil with the flower on it aside in a warm, dry location. Don't peel away the foil until the icing is completely dry.

Monday, December 3, 2012

Royal Icing Christmas Light Bulb

This is a good case of piping what I know. I grew up on the classic C7 and C9 Christmas lights, and never warmed up to any other variety (especially those cool-burning environmentally-friendly lights that look like the inside of a refrigerator; they may save the earth, but they're the antithesis of festive!). All you'll need to pipe tiny little classic Christmas lights are stiff consistency royal icing in yellow, black, and whatever color you like, round tips #12, #8, and #2, a glue stick, a flower nail, a Styrofoam block to rest the nail in, parchment paper squares, and a dusting pouch filled with a 50/50 mix of cornstarch and powdered sugar. Start by sticking a parchment square to the flower nail with a dab from the glue stick. 
 Hold the #12 tip almost flat alongside the surface and squeeze out a ball of icing. Move the tip along while decreasing pressure for a little more than half an inch. Stop pressure and pull the tip away.
 Pipe the base with the #8 tip on the yellow icing. Hold the tip against the wide end of the bulb, squeeze briefly, move the tip along, then stop pressure and pull the tip away. I tried to create "threads" by pulsing the tip in and out but they sort of melted together.
 Pipe a tiny black dot with the #2 tip, then flatten it with a fingertip after touching it to the dusting pouch. These would be cute peeking out from under the eaves on a gingerbread house!

Sunday, December 2, 2012

Royal Icing Hostess Ho Ho

Here's a companion to the other day's Hostess Cupcake: the Ho Ho (yep, I'm still pretty broken up about the end of the Hostess company). You'll need stiff consistency royal icing in brown and white, a flower nail, parchment paper squares, an offset spatula, a Styrofoam brick to rest the nail in, a glue stick, a dusting pouch filled with a 50/50 mix of powdered sugar and cornstarch, and round tips #12 and #2. Start by sticking a parchment square to the nail with a dab from the glue stick.l 
Attach the #12 tip to the brown icing. Wipe a fingertip across the end of the tip to make the icing flat. Hold the tip almost flat along the surface and squeeze out about an inch of icing. Slide the offset spatula into the icing to make a perfect cylinder (just like the real Ho Ho's used to be…sniff).
Allow the icing to firm up completely.
Attach the #2 tip to the white icing and pipe a tiny spiral at the ends. This would make a cute garnish on any chocolate, cream-filled dessert (but nothing will ever replace Ho Ho's).

Sunday, November 18, 2012

Royal Icing Hostess Cupcakes

What a blow to nostalgia many folks were dealt with the recent demise of Hostess products. I'm quite certain Hostess Cupcakes were most Americans' first introduction to piping! To create tiny little cupcakes with that iconic Hostess curlicue, you'll need stiff consistency royal icing in brown and white, round tips #12 and #2, a flower nail, a Styrofoam block to rest the nail in, parchment paper squares, a glue stick, and a dusting pouch filled with a 50/50 mix of powdered sugar and cornstarch. Start by sticking a parchment square to the flower nail with a dab from the glue stick. 
 Hold the #12 tip at a right angle to and just above the surface. Squeeze out a ball of icing, then stop pressure and pull the tip away. Touch a fingertip to the dusting pouch and tap the bottom flat. Allow it to dry thoroughly.
 Peel away the parchment paper and get ready to pipe on the side that used to be faced down.
 Use the #2 tip to pipe the curlicue (I think I held the tip at about a 45 degree angle). I suppose these would be most appropriate as toppers on cream-filled cupcakes or petits fours (and always in pairs).

Wednesday, November 14, 2012

Royal Icing Shock of Wheat

Here's an alternative to all the usual autumn icons (pumpkins, leaves, etc): a shock of wheat. All you'll need is yellow stiff consistency royal icing, oval tip #55, round tip #2, a flower nail, a Styrofoam brick to rest the nail in, a glue stick, parchment paper squares, and a dusting pouch filled with a 50/50 blend of cornstarch and powdered sugar. Start by sticking a parchment square to the flower nail with a dab from the glue stick. 
 Use the #2 tip to pipe a cluster of lines about 1.5" long. Curve the outer lines inward in the middle to give the cluster a "waist."
 Pipe a few lines across the middle to "bind" the cluster at its narrowest point.
 Switch to the #55 tip and pipe the heads of wheat. Pulse the tip in and out to create texture. When the icing is dry, peel away the parchment square, and use this to decorate any tiny dessert (especially one containing wheat!).

Sunday, November 11, 2012

Royal Icing Pilgrim Hat

I thought about waiting until closer to Thanksgiving to post this one, but I wanted to give you a chance to pipe a whole bunch of pilgrim hats if you're so inclined (the last thing you want to be worried about when the turkey is supposed to be taking center stage is whether or not you have the fixin's for black icing). All you'll need to pipe pint-sized pilgrim hats is round tips #12 and #2, black and yellow stiff consistency royal icing, a flower nail, a Styrofoam block to rest the nail in, a glue stick, parchment squares, and a dusting pouch filled with a 50/50 mix of cornstarch and powdered sugar. Start by sticking a parchment square to the flower nail with a dab from the glue stick. 
 Attach the #12 tip. Hold it just above and at a right angle to the surface. Pipe a circle (the brim of the hat), and tap the icing flat with a fingertip after touching it to the dusting pouch. The shape should be about the size of a nickel. Allow it to firm up for a few minutes.
 Also with the #12 tip, pipe the crown of the hat. Hold the tip at a right angle to and just above the center. Squeeze while drawing the tip up a little less than half an inch. Stop pressure and pull the tip away. A peak will remain. Touch a fingertip to the dusting pouch and tap it into a shape as close to the iconic pilgrim hat as you can (a sloping cylinder with a flat top).
 Allow the icing to firm up for a few minutes, then switch to the #2 tip on the yellow bag. Pipe a small square with a crossbar over one of the vertical lines. Tap down any peaks with a dusted fingertip. Use these to decorate any Thanksgiving desserts, such as petits fours or even individual slices of pumpkin pie.

Monday, November 5, 2012

Royal Icing Swiss Army Knife

Yesterday I received a request for something Swiss, and here it is! All you'll need to pipe a tiny Swiss Army Knife (of the single blade variety) is stiff consistency royal icing in red and white, round tips #12 and #2, petal tip #101, oval tip #55, a flower nail, a Styrofoam block to rest the nail in, a glue stick, parchment paper squares, a dusting pouch filled with a 50/50 mix of powdered sugar and cornstarch, silver dust like Wilton's Shimmer Dust, and a small brush. Start by sticking a parchment square to the flower nail with a dab from the glue stick. 
 Attach the round #12 tip to the red icing, and hold it at a right angle to and just above the surface. Squeeze while moving the tip along for about an inch and a half, then stop pressure and pull the tip away. Touch a fingertip to the dusting pouch and tap down the peak, if one remains.
 Use the petal tip to pipe the knife blade. Load it onto the white icing, hold it against the side of the knife and flat against the surface, then squeeze while moving the tip along for about half an inch before stopping pressure and pulling the tip away. You may need to define the tip with dusted fingertips.
 Switch to the #55 tip and pipe a cross. Flatten it a bit with a dusted fingertip.
 Switch to the round #2 tip and pipe a small "o" for the keyring. Pipe a short length over one side of the "o" to "anchor" it to the knife.
 Dip your brush in the shimmer dust and gently brush it over the keyring and knife blade. This knife might not get you out of any pint-sized emergencies, but it will look cute on any cake having something to do with camping, Scouts, or all things Swiss!

Sunday, November 4, 2012

Royal Icing Decorative Gourds

This might be the first of a number of decorative gourd recreations; they're easy, cute, there's a million varieties of them (well, at least dozens), and they'd look great in a cornucopia of other symbols of the season on a cake (or even a pie!). All you'll need to pipe the yellow, bumpy variety of decorative gourd is stiff consistency royal icing, round tips #12 and #2, a flower nail, a Styrofoam block to rest the nail in, parchment paper squares, a glue stick, and a dusting pouch filled with a 50/50 mix of powdered sugar and cornstarch. Start by sticking a parchment square to the flower nail with a dab from the glue stick. 
 Hold the #12 tip at a 45 degree angle to and just above the surface. Squeeze hard to pipe a ball, then decrease pressure and move the tip along for a few millimeters before stopping pressure and pulling the tip away. If a peak remains, touch a fingertip to the dusting pouch and tap it down. Allow the icing to dry for a few minutes.
 Switch to the #2 tip and pipe a scattering of dots, single and in clusters. Tap down any peaks with a dusted fingertip. If you happen to know the proper name for this particular gourd, please send me a message because I couldn't figure it out!

Monday, September 24, 2012

Royal Icing Diana Fritillary Butterfly

Tonight's project is the official butterfly of Arkansas, the Diana Fritillary butterfly. I should specify, this is the male; the female is black with blue and white markings. All you'll need is stiff consistency royal icing in orange and black, a brown food-safe marker like the AmeriColor Gourmet Writer, a glue stick, parchment paper squares, a flower nail, a Styrofoam brick to rest the nail in, petal tip #104, and round tip #4 and #2. Start by sticking a parchment square to the nail with a dab from the glue stick. 
Hold the #104 tip almost flat against the surface, and pipe 4 round petals in classic "butterfly" formation. 
 Allow this shape to dry. Use the dark brown marker to paint in a sort of "inkblot" in the middle…
 …with lines radiating outward…
 …and dots in between them.
 Using the #4 tip, pipe the body. Hold the tip at a 45 degree angle, and pulse your hand in and out as you pipe so the body will appear segmented
 Rotate the nail around and pipe a ball for the head.
 Switch to the #2 tip and pipe the antennae. Definitely a good butterfly for fall!