Showing posts with label parchment paper. Show all posts

Thursday, May 17, 2012

Cutting Parchment Paper Squares

Every so often, I have to set aside the piping bag or whatever I'm working on in favor of some form of cake-related maintenance, and today's project is the cutting of parchment paper squares. So, apologies for the dearth of pretty pictures; today I'm going to show you how to save money by cutting your own squares, which are a staple of pretty much any project involving royal icing and a flower nail. I'm not sure you can even buy pre-cut parchment squares on the Wilton site anymore; they appear to have vanished. If so, good riddance. One pack of 100 cost about as much as an entire roll of parchment paper if memory serves, and if you were to cut the entire roll into squares you'd have 1008 squares; that'll see you through piping a boatload of roses! All you need to cut your own squares is a pair of scissors and something good on TV, but if you want to set up your own factory of sorts, you'll need a self-healing mat, an X-Acto knife, a cutting rail, and a roll of parchment paper. Everything can be found at art supply stores (as opposed to craft stores; I don't think I've spotted cutting rails at Michael's, but I've never gone looking for them). I think you can find self-healing mats in the scrapbooking section. This one is made by X-Acto, and has a workable area of 11x17. It's probably about 20 years old; the lines are so faint in the middle I wasn't able to take an in-focus photo of it. 
 The X-Acto knife you're no doubt familiar with. I like this one, because it has a rubbery grip to it. As soon as I took it out of the package I immediately painted the cap's tip with red nail polish; the clear cap would have been just too easy to lose, and an X-Acto knife without a cap is just trouble waiting to happen.
 Be sure to use a cutting rail; that lip on the far side will protect your fingertips in ways regular rulers can't.
 Start by cutting the edge of your parchment clean with the X-Acto knife; that serrated cutter on the box won't give you a perfect edge.
 Roll the paper out across the mat, and line the cut edge up with the furthermost line. Use your cutting rail to anchor the paper down (because it will want to curl back under itself)…
 …two inches in from the edge.
 Hold the rail firmly (and with no fingers overhanging the lip), and draw the blade along it from the far end towards yourself.
 After you've cut four of them (or more or less; any more than 4 and they start slipping around on me), stack them up…
 …and line them up against one of the lines on the mat. Anchor them with the cutting rail two inches away, and assertively cut through the stack. Repeat, repeat, repeat. At some point, you might notice it's time to change the blade; always have a seemingly infinite supply of spare blades on hand.
 Now get piping! You can buy new tips with the money you save cutting your own parchment squares.

Tuesday, March 27, 2012

Royal Icing Eggs

There's not a lot to piping royal icing eggs, but ideally they truly come out looking like eggs; not ovals. All you'll need is a piping bag filled with stiff consistency royal icing (in any color you want, obviously) and fitted with a round #12 tip, a parchment paper square for each egg, and a dusting pouch filled with a 50/50 mix of powdered sugar and cornstarch. 
 If you cut the parchment paper squares yourself off a roll, they'll have a curve like this:
 You'll use the gravity generated by that curve to form the egg. Yet another reason to cut your own parchment squares and not buy them pre-cut (such a waste of money). Hold the bag at about the same angle as the curve with the tip just above the paper. Start squeezing, and when the icing ball is about twice the width of the piping tip, start drawing the tip away from it.
 On an approximately 1.5" square, I stopped the tip at the midway point.
At this point, stop squeezing and pull the tip away. A peak like this will probably be left behind:
 Generously dust your finger by tapping it against the side of the dusting pouch, then tap the peak lightly until until it goes away.
 Allow the eggs to dry for a few hours. You can speed up this process by keeping them under a desk lamp (incubating them, if you will).
Always make more than you think you need. You can use only the ones that turned out best, or hide the less-cute ones at the bottom of a pile or around the back side of a cake.

Friday, March 2, 2012

Piping Dogwood Flowers in Royal Icing

I love dogwood flowers, perhaps because they aren't easy to come by. There's a dogwood tree in my yard that's almost half a century old that started to produce blooms only a few years ago! Dogwood flowers are easy to make using gum paste; all sorts of cutters and impression mats are available. However, I really wanted to try to figure out how to pipe them with royal icing; I definitely plan to incorporate them next time I make a stump cake. I think I came up with a pretty accurate representation of them. Here's the setup; a Styrofoam block (to act as a third hand for holding the flower nail), a non-toxic glue stick, dark pink Color Dust, a small brush, parchment paper squares, a flower nail, a dusting pouch filled with a 50/50 mix of powdered sugar and cornstarch, 3" flower forming cups, a pastry bag filled with royal icing and fitted with a Wilton #101 rose tip, and a pastry bag filled with yellow royal icing and fitted with the Wilton #233 tip:
Dab some glue on the flower nail and stick down a parchment paper square. 
 Holding the rose tip almost flat against the surface with the narrow end of the tip pointing outward and the wide end in the center, pipe a long heart shape all the way to the edge of the nail. Keep the pressure pretty steady and firm the whole time. If you somehow wind up with a hole in the middle of this petal, touch one of your fingers to the dusting pouch and tap the icing down around the hole.
 Make the second petal opposite to the first. Attempt to make them somewhat symmetrical; all the petals will be the same size. If a large accumulation occurs in the center, it can be tapped down with your dusted finger.
 Here's the third petal…
 …and the fourth.
 Slide the parchment paper off the nail (breaking the seal with the glue), and place it on the flower forming cup to dry with a subtle concave shape:
 After the flower has had a chance to firm up for a bit, pipe the yellow center with Tip #233. Hold the tip just above the center and squeeze out a center consisting of very short strands; squeeze, stop the pressure, lift the tip away. Move the tip over the width of one of the strands, and squeeze out a second set.
 This way the center won't be a perfectly spaced, unnatural looking cluster of dots.
 When the petals have dried completely, dust the edges with the pink dust. As you dust each petal, you can shake off the excess away from the rest of the flower.
 Here are all four petals, dusted. Incidentally, this step is optional; the flowers in my yard don't have pink edges. I like how the dogwood flower turned out; it even has the lines running the length of the petals. I plan to figure out how to make more flowers that aren't based on something I learned in a Wilton class soon!

Tuesday, February 28, 2012

Another Use for a Flower Nail

I love learning new uses for various and sundry items. As I've been baking larger cakes, I've been encountering the issue of cutting off increasingly larger crowns (the dome that forms on a cake). That part never goes to waste in my house; I've turned crowns into everything from mini-cakes to "trifle for one." There are, however, times when you need the cake to bake evenly and develop as small a crown as possible; namely when you're baking a large or long cake. You can either spend money on heating cores, or reach for a couple of trusty flower nails (and save that money to buy another pan or some other thing that can't possibly be considered gadgetry). The way to use flower nails as heating cores is simple; start by greasing your pan with butter and flouring it lightly (this is a 13 by 9 pan; part of a 4-piece egg-shaped pan set): 
Cut out a piece of parchment paper to fit and anchor it down with a couple of flower nails; I think they ought to be at least an inch across (unlikely to tip over under any circumstances):
In the case of this long pan, I used two:
Pour the batter in:
Even it out with a spatula, if need be, and pop it in the oven. 
This cake was ready in about 25 minutes. Set the cake on a rack to cool. 
 When the cake is completely cool, put a second rack on top of it, feet up.
 Invert the cake, and remove the rack the cake had been sitting on.
 Remove the pan; you can see the nails through the parchment paper.
 Peel back just enough of the parchment to retrieve the nails, and press the parchment back into place.
 Put the rack back on the cake, feet up:
 Invert the cake a final time. When you remove the rack, these lines will remain, but they'll be gone when you level off just the brown part of the cake. Proceed as usual with torting, filling, stacking, etc.
 You'll be seeing more of this cake in the days to come; I have big plans for it!

Monday, January 23, 2012

The Wilton Rose: A Variation


I don't think there's an icing flower that has more online tutorials than The Wilton Rose (including this one on the Wilton site). So, my goal isn't to provide the world with yet another one, but rather to show you a small trick I figured out for making a better looking Wilton Rose. Every time I attempted it, I'd wind up with a squashy, melted puddle of icing, no matter what temperature or consistency I was working with. Case in point:
I roll my own eyes. They look like wads of chewed-up, stepped-on gum; all wrong! And I swear, I followed those directions to the letter, both on my own and in class. It wasn't until I figured out how to make royal icing pine cones that I came up with the idea of piping the base, letting it dry, and then piping the petals. Here's the set-up:
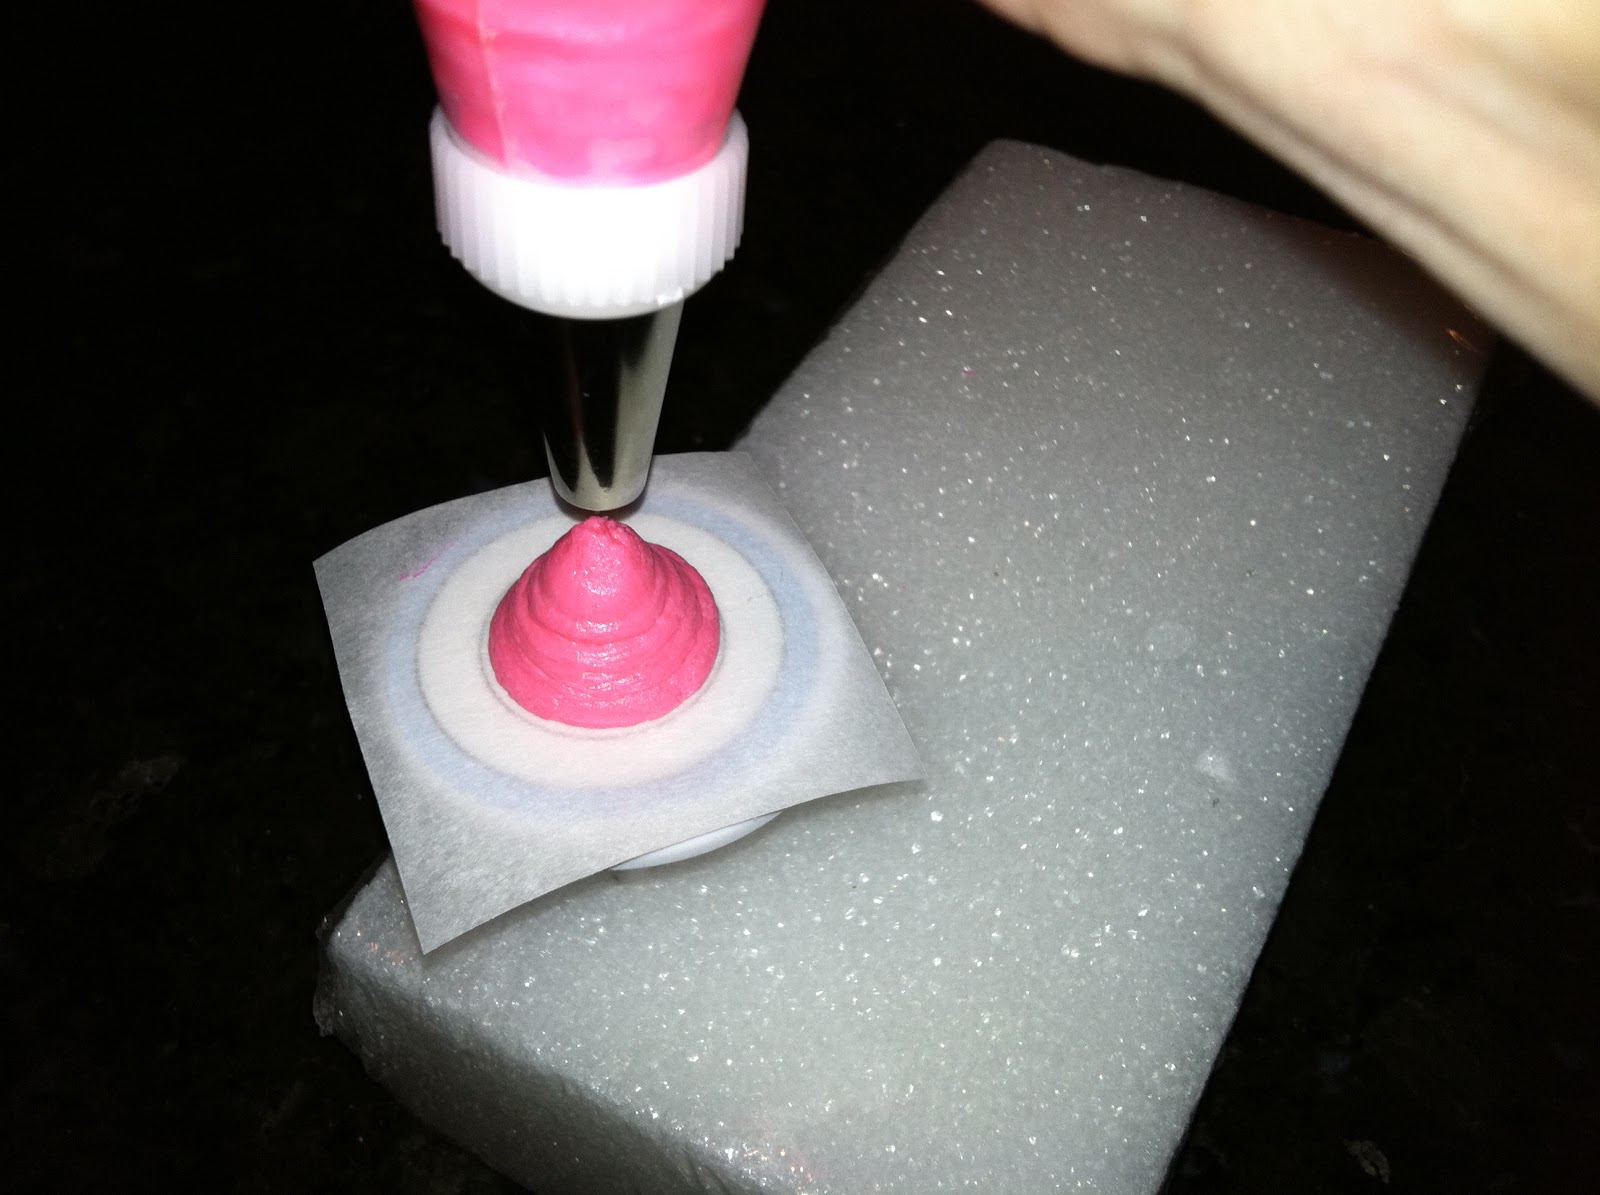
That's a Styrofoam brick, which makes a great third hand when you're hard at work. There's a rose nail stuck into it; the rose nail has a decal on it that provides a guide for how large to pipe the base. To the left are a 2" by 2" piece of parchment paper (you'll need one for each rose), a glue stick (for temporarily attaching the paper to the rose nail, and the medium round tip #12 and the rose petal tip #104. Start by putting a dab from the glue stick on the nail, and attaching a parchment paper square to it:
Load two piping bags with royal icing in whatever color the roses are going to be, or one bag with the round tip and a coupler. Start by piping the base, which is basically a Hershey's Kiss (the official Wilton tutorial linked to earlier will provide you with more complete guidelines regarding angle and pressure):
Slide the paper with the piped base on it gently off the nail and set it aside; tug it gently to release it from the glue. Allow the base to dry about 20 minutes; it will crust over sufficiently. Here are a variety of bases; the best one is in the middle, but remember: they don't need to be perfect…
…because they'll be covered with petals. The center petal is spiraled around the tip of the base, using the #104 tip:
Three overlapping petals are then piped around:
And then five petals:
And then seven:
The difference between these roses and my earlier efforts is pretty dramatic! Incidentally, the icing I used for both attempts at The Wilton Rose came from the same batch, which I made following this recipe. I recommend it wholeheartedly; not only does it work well for piping flowers (and pine cones), I actually think it tastes pretty good!