Showing posts with label Easter. Show all posts

Wednesday, September 5, 2012

Royal Icing Pasque Flower

The official state flower of South Dakota is the pasque flower, which is also called the May Day flower, the Easter flower, the prairie crocus, the wind flower, and the meadow anemone. According to legend, pasque flowers grew alongside Jesus' tomb and were part of His resurrection. They're also highly toxic, and for that reason might be a peculiar choice for a cupcake topper, but I'm sure some folks like to live dangerously. 

To pipe pasque flowers (or pasqueflowers), you'll need stiff consistency royal icing in purple and yellow, tip #104, tip #3, tip #2, a flower nail (you can use a 6-petal flower template to help keep your petals even), parchment paper squares, a glue stick, a Styrofoam block to rest the nail in, and a dusting pouch filled with a 50/50 mix of powdered sugar and cornstarch. Start by sticking a parchment square to the nail with a dab from the glue stick. 
 Put the #104 tip on the bag of purple icing and pipe an oblong petal. Lay the tip almost flat against the surface with the narrow end facing outwards and pipe while moving your hand in an upside-down "U" motion.
 Repeat for a total of six petals. Touch your fingertips to the dusting pouch and subtly taper the outer edges of each petal. Allow the petals to firm up for a while.
 Load the #3 tip on the bag of yellow icing and pipe a cluster of stamens. Hold the tip at a right angle and against the center, squeeze while pulling upwards a short distance, then stop pressure and pull the tip away. Touch a fingertip to the dusting pouch and adjust the direction of the stamens, if need be. Allow them to dry for a few minutes.
 Switch to the #2 tip on the purple bag and pipe an even smaller cluster of stamens in the center of the yellow cluster. Consider these for an interesting alternative to other traditional Easter icons, or when you're making a cake in honor of South Dakota.

Wednesday, July 11, 2012

Royal Icing Carrots

Carrots are an easy decoration that is appropriate for all sorts of cakes: spring-themed, Easter, garden-inspired, and (of course) carrot cakes. All you need to pipe a whole bushel of carrots is stiff consistency royal icing in orange and green, round tips #12 and #3 respectively, a parchment paper square for each carrot, flat toothpicks, and a dusting pouch filled with a 50/50 mix of cornstarch and powdered sugar. 
 Pipe the basic carrot shape with the #12 tip. Hold it just above the surface of a parchment square, angled slightly upward. Pipe a ball, and as the ball forms, move the tip along the parchment slowly, decreasing pressure as the carrot shape forms. When it's the length you want, stop pressure and pull the tip away.
 Tap the toothpick against the dusting pouch and gently press some grooves into the icing before it starts to firm up. I like to make the grooves along one side first, and then make them on the other side.
 I think the grooves look more realistic if they don't line up exactly. Allow the carrots to firm up for at least 15 minutes (place them under a desk lamp to speed up this process).
Pipe the stems with the #3 tip. Hold the tip against the surface, squeeze, then pull away, stopping pressure almost immediately. Three or four of these little points look about right. 
I piped some royal icing bunnies a few weeks ago; if today's project goes missing, I'll know where to look.

Monday, April 30, 2012

Flower Basket Cake Pop

Here we go; I guess I'm getting sucked into the cake pop phenomenon! What can I say; they're way festive, relatively quick, and an excellent way to practice various cake techniques (in this case, basketweave) on a small surface (not an entire cake). The pop can be made using the Rice Krispy Treat (RKT) method, or the basic cake ball pop recipe. As you can see, I used RKTs. I only needed to make 12, so I split the standard RKT recipe in half (2 cups of mini marshmallows melted with 2-3 tablespoons of butter, a scant teaspoon of vanilla stirred in, and 3 cups of Rice Krispies mixed in once the mixture is removed from heat). Press it into a greased 11 3/4 x 7 1/2" pan, and cut it into 12 rectangles. Here's one of them…
 …which yields a ball this size. Tear the RKT into bits on a waxed paper surface, butter your hands, and roll the pieces into a ball. Really press it down tight so the ball is very dense.
 Press the ball against the waxed paper surface…
 …and form a flat side (the top).
 Melt some chocolate (like Guittard Melt n' Mold Chocolates), dip the tip of a 4" lollipop stick into it, and stick it into the bottom of the basket shape. Push it almost all the way to the other end (but not all the way through; hold your finger over the tip, and you'll feel the stick coming before it pokes through). Melt chocolate or candy and dip the pop according to the RKT pop recipe.
 This is an ideal tip for small basketweave: Magic Tip #45 (it's serrated on both sides).
 You may want to refer to my step-by-step basketweave instructions. The method for the flower basket cake pop is the same; just a lot smaller. Load a piping bag with melted chocolate or candy (or medium consistency royal icing, like I did), and pipe a line from the point where the stick meets the basket's bottom to the basket's edge.
 This should look familiar, if you've done basketweave before. The main challenge is not letting your fingers get in the way. Be sure to have a Styrofoam block handy so you can push the pop's stick into it if you need to rest your hands, reload the bag, etc. (and so you'll have someplace to set the pop to dry when you're done).
 Continue piping the basketweave all the way around…
 …until you're back where you started. Do your best to keep the vertical spokes of the basket truly vertical (mine tended to angle one way or the other; it was a constant battle).
 Switch the tip to a star tip #16, and pipe a shell border around the basket's edge.
 Load up another piping bag with green royal icing (or melted candy) and a leaf tip #68. Pipe a few leaves
 …and while they're still wet push a few flowers into them. You could use royal icing flowers you've pre-made, or a few Daisy Sprinkles. I'm definitely going to revisit this idea next Easter, and swap out the flowers for jelly beans!

Tuesday, March 27, 2012

Royal Icing Eggs

There's not a lot to piping royal icing eggs, but ideally they truly come out looking like eggs; not ovals. All you'll need is a piping bag filled with stiff consistency royal icing (in any color you want, obviously) and fitted with a round #12 tip, a parchment paper square for each egg, and a dusting pouch filled with a 50/50 mix of powdered sugar and cornstarch. 
 If you cut the parchment paper squares yourself off a roll, they'll have a curve like this:
 You'll use the gravity generated by that curve to form the egg. Yet another reason to cut your own parchment squares and not buy them pre-cut (such a waste of money). Hold the bag at about the same angle as the curve with the tip just above the paper. Start squeezing, and when the icing ball is about twice the width of the piping tip, start drawing the tip away from it.
 On an approximately 1.5" square, I stopped the tip at the midway point.
At this point, stop squeezing and pull the tip away. A peak like this will probably be left behind:
 Generously dust your finger by tapping it against the side of the dusting pouch, then tap the peak lightly until until it goes away.
 Allow the eggs to dry for a few hours. You can speed up this process by keeping them under a desk lamp (incubating them, if you will).
Always make more than you think you need. You can use only the ones that turned out best, or hide the less-cute ones at the bottom of a pile or around the back side of a cake.

Tuesday, March 13, 2012

Royal Icing Baskets

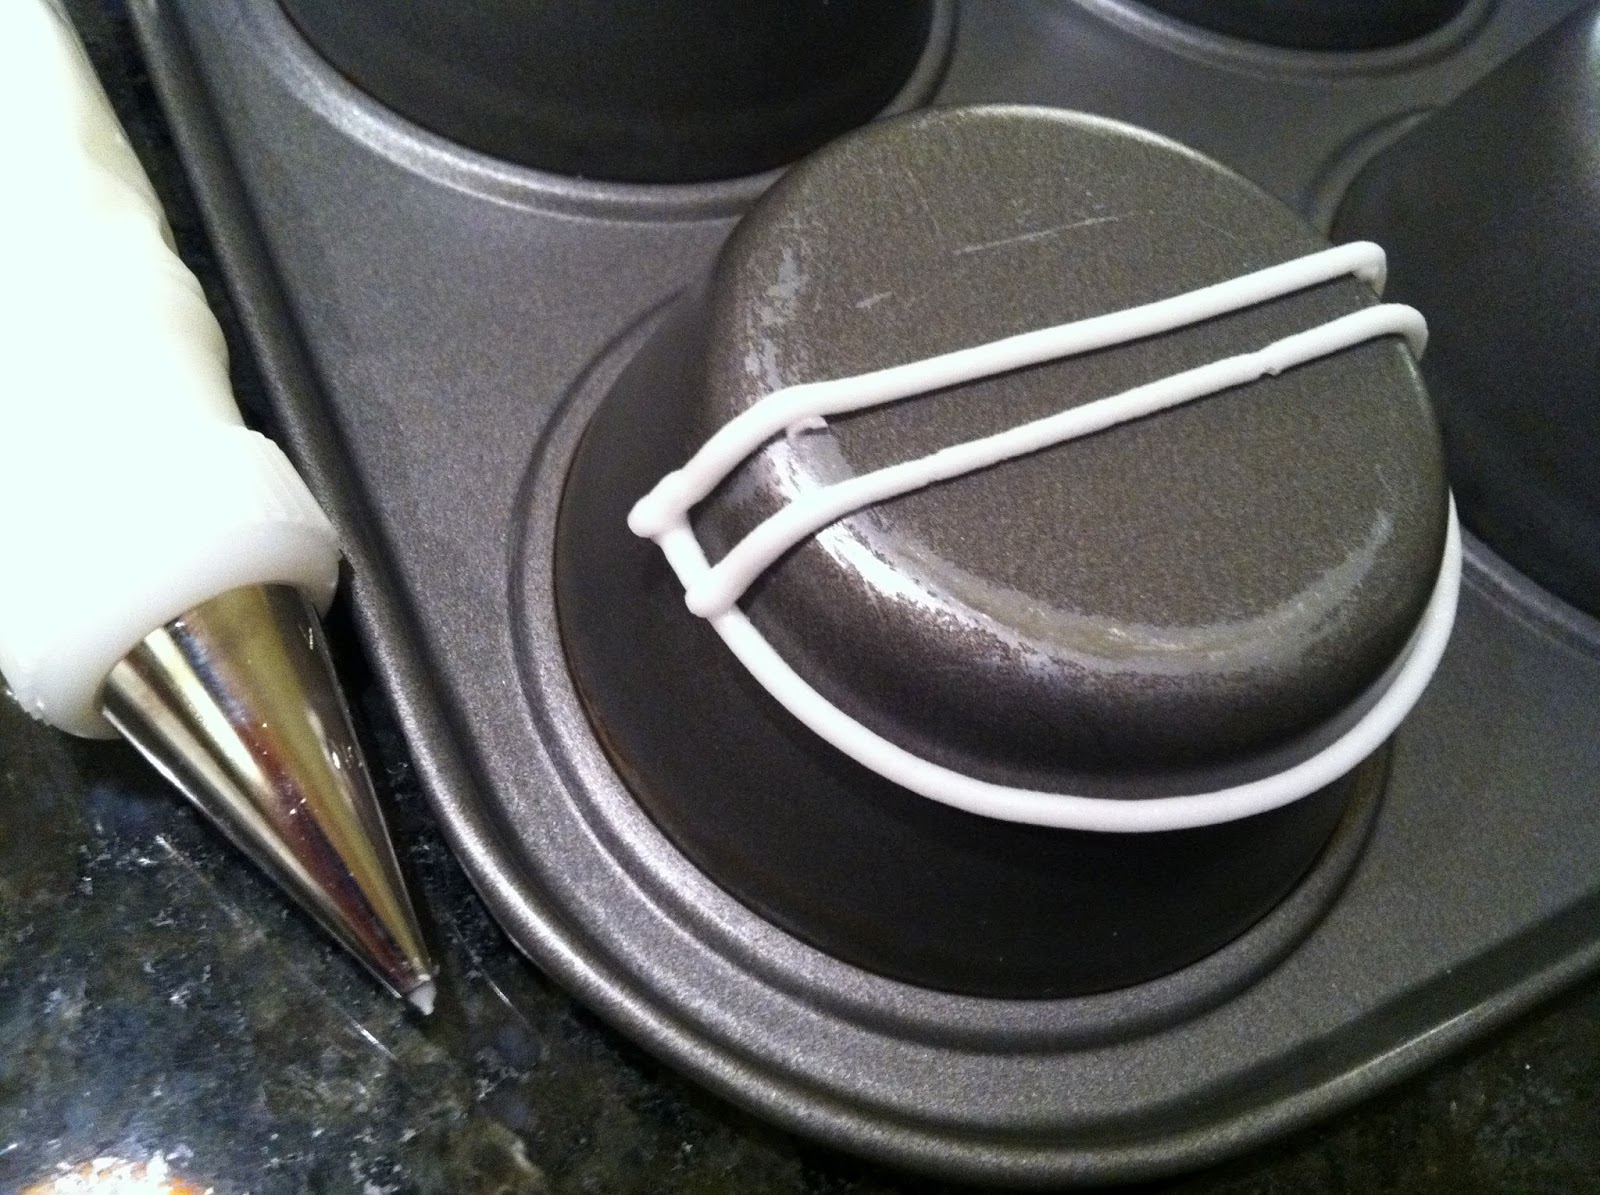
I received the phenomenal 2010 book "The Art of Royal Icing" by Eddie Spence for my birthday. If I were to attempt all the projects in it, this blog would be like Julie & Julia all over again (and nobody wants that). His projects run the gamut from relatively simple blooms piped on a flower nail to a freestanding royal icing gazebo, so I thought I'd attempt something in the middle and toward the easier end: royal icing baskets (what with Easter being on the way and all). The setup for this project is simple…and baffling. I'd always heard the warnings of "royal icing and grease don't mix," "make sure all your utensils are grease-free," "grease will cause royal icing to 'break down'", etc. So when the brilliant Eddie Spence starts his instructions with "Grease the underside of the tin/container with white vegetable fat" I thought the man must have had a little too much cake with his wine. I considered attempting this project sans Crisco, but decided against it; Eddie bleeds royal icing, and must know what he's talking about. So, to make royal icing baskets, here's all you'll need: Crisco, a muffin pan, and a piping bag full of stiff-consistency royal icing, fitted with a round #2 tip.
 Start by greasing the underside of the muffin pan with Crisco. Use the tiniest amount you can imagine:
 I made a couple of dots to give myself a permanent reminder of the middle of the cup. The first line is basically a drop string, which I haven't blogged about yet (I'm going to need to post a video to properly demonstrate them). Essentially, you'll need to pick up the muffin pan, squeeze a dot as a sort of anchor on one side of the cup, and then continue squeezing as you move the tip around the cup; the icing won't be touching the cup until you reach the other side, when you rein it in by touching and anchoring the tip to the opposite side of the cup from where you started. Alternately, I suppose you could just pipe a curved line along the cup, but I wouldn't have trusted my oft-shaking hands to get that first line as straight as with the drop string method. This line won't matter too much, by the way, as it'll be covered in all sorts of other elements shortly.
 In between each step I allowed a few minutes to pass so the icing could firm up a bit (a process that can be sped up by having a heat-producing desk lamp handy). The next step is to pipe a couple of cross-pieces:
 I kept my dusting pouch (filled with a 50/50 mix of powdered sugar and cornstarch) handy so I could touch my finger to it and tap down any points that formed at the end of each piped line. The next step is to pipe the latticework. Start in the middle and work your way in one direction or another, piping diagonal lines that connect the lower cross-piece and the curved line at the bottom. The lines should be evenly spaced, about the width of the tip #2.
 After allowing the first set of diagonal lines to firm up for a few minutes, the second set in the opposite direction gets piped, again starting from the middle:

 The next steps are all about strengthening the structure. First you'll want to do something with the top cross-pieces; you could pipe leaves, lines, dots, whatever. I piped a wavy line first in one direction, then the other:
 Finally, pipe a border along the bottom; this border is known as a running bead.
I allowed it to dry for about 10 hours, confident the whole time that everything I'd ever heard about royal icing and grease would cause an enormous meltdown. When I gently nudged the underside (near the border) with my thumbnail, the basket popped off effortlessly, thus dashing all the lies and propaganda I'd ever been fed on the subject of Crisco. Here's the basket's underside:
And here it is in a potential final position, filled with a bouquet of blossoms (all attached with royal icing). A handle, leaves, or further decoration could be piped once the basket is firmly attached to the side or top of a cake. Imagine all the other containers royal icing baskets could be piped on! I'm planning to do a bowl of some sort to use as a cake topper in the near future (possibly using a small basketweave tip). 

Friday, February 24, 2012

Royal Icing Bird Nests with Eggs

If you need an absolutely adorable cupcake topper or cake decoration, look no further. In fact, I think these sweet little bird nests could be served straight up. Make a batch of royal icing and get set up with a piece of parchment paper taped to a cookie sheet:
Drop a multi-hole tip like the Ateco #234 into a piping bag (Wilton makes a similarly-numbered tip). This is a larger version of the #233, which is useful for piping small-scale grass, fur, hair, flower centers, etc. I wouldn't bother using a coupler for this project:
Load the bag with some brown royal icing. I used AmeriColor Soft Gel Paste in Chocolate Brown:
Set out jelly beans or small malted eggs in groups of three for each nest. No point in fumbling for the right color or sifting out the mutant ones while your icing is drying.
Holding the bag perpendicular to the surface, pipe a circle about 1.5" across. Finish it by spiraling in toward the center. I gave it a little extra "squish" in the center to hold the "eggs" in place:
Nestle the three eggs into the center. You could easily color-coordinate them for some event other than Easter. Being Irish, I'm always looking for new ways to use these colors:
I'd better get started on some royal icing birds to sit on these…