Showing posts with label cake pop. Show all posts

Monday, November 26, 2012

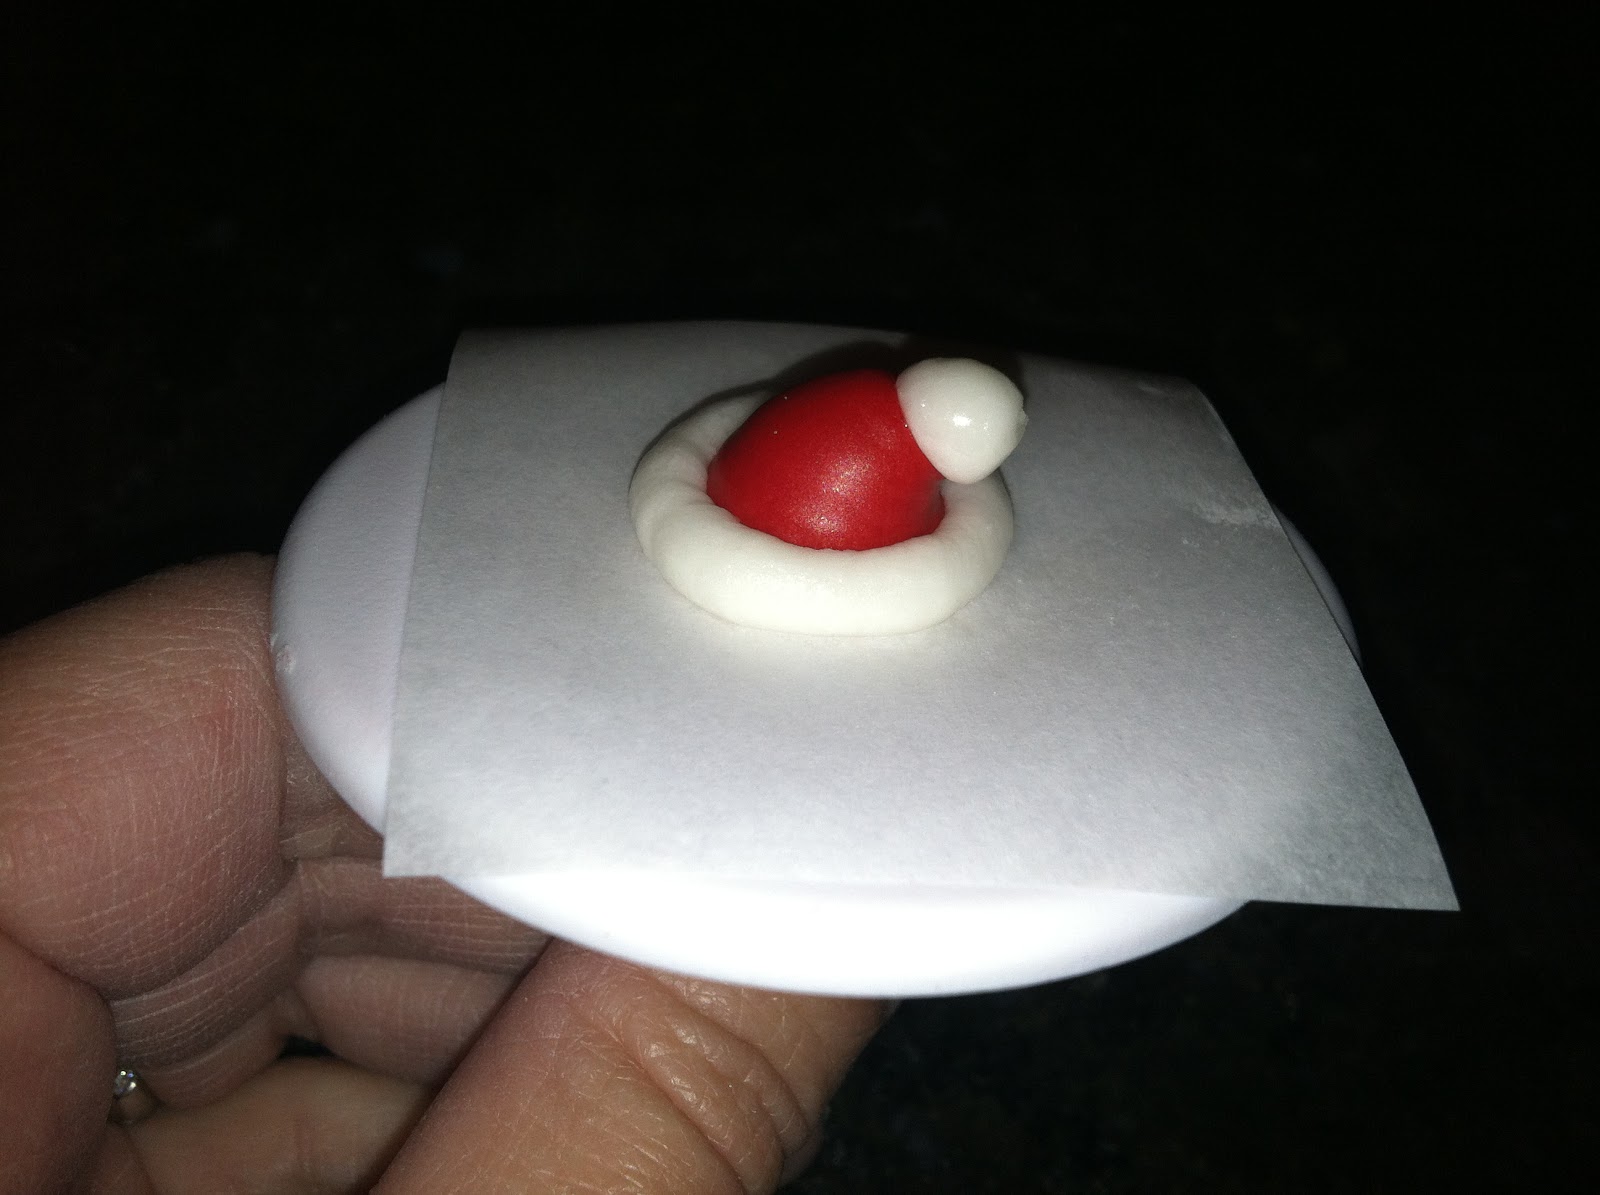
Royal Icing Santa Hat

A royal icing Santa hat would be cute on cupcakes or petits fours, but I think it would be especially useful as a topper on a Santa Claus cake pop. You'll need stiff consistency royal icing in red and white, round tips #12 and #8, a flower nail, a Styrofoam block to rest the nail in, parchment paper squares, a glue stick, and a dusting pouch filled with a 50/50 blend of cornstarch and powdered sugar. Start by sticking a parchment square to the flower nail with a dab from the glue stick. 
 Attach the #12 tip to the red icing. Hold the tip at a 90 degree angle to and just above the surface. Squeeze while drawing the tip up for about 3/4". Stop pressure and pull the tip away. Touch a fingertip to the dusting pouch and gently nudge the peak of the icing over to one side. Allow this shape, the base of the hat, to dry for about 15 minutes.
 Attach the #8 tip to the white icing and pipe the brim of the hat. Pulse your hand slightly to give it some texture. Touch a fingertip to the dusting pouch and tap the area where the two ends meet to blend them, if need be.
 Pipe a ball at the pointed end of the hat shape with the #8 tip. Hold the tip a few millimeters away from the surface, squeeze out a ball, stop pressure and pull the tip away. Shape the icing with dusted fingertips into as close to a ball as you can. These hats would instantly turn any cake pop animal into a Christmas version of itself!

Friday, October 26, 2012

Royal Icing Mummy Face

There sure are a lot of variations on the mummy cupcake; do a Google image search and see what you come up with! Here's how to make a tiny mummy face, suitable for petits fours, flat-sided cake pops, mini cupcakes, whatever; you could even pipe them directly on Nilla Wafers. You'll need stiff consistency royal icing in white, black, and whatever color you want for the eyes, round tips #3, #8, and #12, ribbon tip #44, a flower nail, a Styrofoam block to rest the nail in, a glue stick, parchment paper squares, and a dusting pouch filled with a 50/50 mix of powdered sugar and cornstarch. Start by sticking a parchment square to the flower nail with a dab from the glue stick. 
 Hold the #12 tip just above and at a right angle to the surface and pipe a ring with the black icing. Touch a fingertip to the dusting pouch and tap the icing into a disc. Allow it to firm up for a few minutes.
 Pipe two dots of yellow (or whatever color) icing with the #8 tip. Flatten them slightly with a dusted fingertip.
 Switch to the #3 tip on the black icing and pipe two dots for pupils. Piping the bandages with the #44 tip requires no instruction; pipe them any way you like. I figured I'd start around the eyes, slightly overlapping them.
 Continue piping strips of white icing until the black is covered. Don't worry too much about asymmetry, ragged edges, etc. When the icing is dry, peel away the parchment and stick this spooky face on any ghoulish dessert you can come up with!


Thursday, October 11, 2012

Royal Icing Eyeballs

 Royal icing eyeballs are a great way to give any dessert more personality. You can even buy them ready-made by Wilton:
But, of course, I think it's way more cool to make your own. All you'll need is stiff consistency white royal icing, a round #12 tip, parchment paper, and a dusting pouch filled with a 50/50 mix of powdered sugar and cornstarch. Hold the tip just above the parchment, squeeze out a "kiss" of icing, stop pressure and pull the tip away. Touch your fingertip to the dusting pouch and then tap down the peak. The icing should settle down into a smooth, rounded disc. 
 You'll also need food-safe markers like AmeriColor Gourmet Writers. When the icing is rock-hard, you can start drawing the eye details on it. 
 I like to start with the red veins. My secret to making them purposefully random is to draw wavy, stylized versions of the letters I, V, and Y (ivy!).
Make a green (or whatever color) circle in the middle…
 …then outline it in black…
 …and finish it off with a pupil. You should put these eyes in all sorts of unexpected places, like on pancakes or on a dollop of whipped cream on hot cocoa!

Monday, October 8, 2012

Royal Icing Witch Hats

Witch hats are one of the easiest (and in my opinion cutest) things you can pipe for Halloween out of royal icing. The hat band is optional, but you could pipe it in any color you want to coordinate with your cupcake liners, icing, whatever. All you'll need are black stiff consistency royal icing (or another, less iconic, color), round tip #12, a flower nail, parchment paper squares, a glue stick, a Styrofoam block to rest the nail in, and a dusting pouch filled with a 50/50 mix of powdered sugar and cornstarch. If you're going to pipe a hat band, you'll want a contrasting color and an oval tip #55 (I used a #57 which was a little too large). Start by sticking a parchment square to the flower nail with a dab from the glue stick. 
 Hold the #12 tip just above and at a right angle to the surface. Pipe an "O", then pipe a dab in the center. LIberally dust a fingertip by touching it to the dusting pouch, then tap the icing to blend it into a flat disc.
 Hold the tip against the center, squeeze, and move the tip upwards about half an inch. Stop pressure and pull the tip away to form a cone.
 Allow it to firm up for a few minutes, then pipe a hat band if you like. Any flat tip will do, but I used an oval tip to see what it would look like with more depth.
 And then I went with one more ring of green icing, because, well, why not? I think it has a Dr. Seuss quality now! When the icing is dry, peel away the parchment and use the hat to decorate any small dessert. I need to try my hand at making witch cake pops!

Saturday, May 19, 2012

The Sotas Technique

I'm pretty sure the only way to mess up the sotas technique is to not be random enough. It has a few similarities to cornelli lace, but the main difference is you can (and should) allow the continuous piped string to cross over itself (the piped line in cornelli lace comes close but never touches). Be sure your icing is thin enough to flow easily out of the bag, and fit the bag with a round #1 or #2 tip (I used a #2).
 It's always a good idea to get a feel for any new technique on a practice board first (even though it's practically impossible to make a mistake piping sotas). Hold the tip just above the surface, and keep moving; make loops, curlicues, infinity signs, etc.; allow the icing to run wild. If you see any wide open spaces, you can probably cheat a little and pipe more loops in any areas that need filling in (just make sure the ends of the string aren't obvious).
 Nilla Wafers, of course, are also a good practice surface. Much yummier than the above board.
 I had a hemisphere-shaped cake pop left over from my last batch; I thought I might make some sort of basket with it. The sotas technique reminds me a little of those freeform kudzu baskets (not traditional basketweave; Google search kudzu basket and you'll see what I mean). Start piping where the pop meets the stick and work your way outward (if you really are going for the kudzu look, you'll want to use light brown icing).
 Stick flowers, leaves, etc. on with a dab of royal icing to finish off the basket. One last word on sotas: your hands will thank you if you don't fill the bag very full. Ideally, the icing will be almost thin enough to pour out, but you definitely don't want to strain your hands squeezing while you're trying to focus on making your random loops. When you squeeze, it tends to make the loopy string look a little less organic; the icing tends to spurt out in different thicknesses and directions that look almost like a mistake. With so much of cake decorating being all about precision, sotas is truly a relief!

Monday, April 30, 2012

Flower Basket Cake Pop

Here we go; I guess I'm getting sucked into the cake pop phenomenon! What can I say; they're way festive, relatively quick, and an excellent way to practice various cake techniques (in this case, basketweave) on a small surface (not an entire cake). The pop can be made using the Rice Krispy Treat (RKT) method, or the basic cake ball pop recipe. As you can see, I used RKTs. I only needed to make 12, so I split the standard RKT recipe in half (2 cups of mini marshmallows melted with 2-3 tablespoons of butter, a scant teaspoon of vanilla stirred in, and 3 cups of Rice Krispies mixed in once the mixture is removed from heat). Press it into a greased 11 3/4 x 7 1/2" pan, and cut it into 12 rectangles. Here's one of them…
 …which yields a ball this size. Tear the RKT into bits on a waxed paper surface, butter your hands, and roll the pieces into a ball. Really press it down tight so the ball is very dense.
 Press the ball against the waxed paper surface…
 …and form a flat side (the top).
 Melt some chocolate (like Guittard Melt n' Mold Chocolates), dip the tip of a 4" lollipop stick into it, and stick it into the bottom of the basket shape. Push it almost all the way to the other end (but not all the way through; hold your finger over the tip, and you'll feel the stick coming before it pokes through). Melt chocolate or candy and dip the pop according to the RKT pop recipe.
 This is an ideal tip for small basketweave: Magic Tip #45 (it's serrated on both sides).
 You may want to refer to my step-by-step basketweave instructions. The method for the flower basket cake pop is the same; just a lot smaller. Load a piping bag with melted chocolate or candy (or medium consistency royal icing, like I did), and pipe a line from the point where the stick meets the basket's bottom to the basket's edge.
 This should look familiar, if you've done basketweave before. The main challenge is not letting your fingers get in the way. Be sure to have a Styrofoam block handy so you can push the pop's stick into it if you need to rest your hands, reload the bag, etc. (and so you'll have someplace to set the pop to dry when you're done).
 Continue piping the basketweave all the way around…
 …until you're back where you started. Do your best to keep the vertical spokes of the basket truly vertical (mine tended to angle one way or the other; it was a constant battle).
 Switch the tip to a star tip #16, and pipe a shell border around the basket's edge.
 Load up another piping bag with green royal icing (or melted candy) and a leaf tip #68. Pipe a few leaves
 …and while they're still wet push a few flowers into them. You could use royal icing flowers you've pre-made, or a few Daisy Sprinkles. I'm definitely going to revisit this idea next Easter, and swap out the flowers for jelly beans!