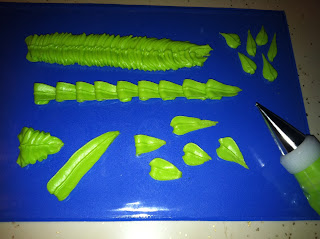
This notch forms the center vein of the leaf. No matter what sort of icing you're piping leaves with (royal or buttercream), you'll want the consistency thin enough so the sides of the leaf on either side of the notch will fuse together as you pull the tip away. I just can't bring myself to show you what the end result looks like with icing that's too thick; I don't do ugly on this blog. Believe me, you'll know a do-over leaf when you see one. If your icing isn't smooth and creamy, add a dab of piping gel. Start small; a half-teaspoon of piping gel for half a cup of icing, or thereabouts. The icing I used for these leaves (Wilton's Ready-to-Use Decorator Icing) started so thick I actually gave it a few seconds in the microwave just so I could get it malleable enough to stir in the piping gel. Using an Ateco tip #69, I piped a few of the most basic leaves. They're all made by holding the tip parallel to the surface, more or less. Start by squeezing firmly, then decreasing pressure as you draw the tip away from the base to form this first leaf:
Stop pressure when the leaf is fairly triangular, and pull the tip away. You can clean up any rough edges with the back of your fingernail, or by tapering a cleaner point by touching your finger against a dusting pouch filled with a 50/50 mix of powdered sugar and cornstarch and then gently tapping the sides of the point into place. Here's a ruffled variation, made in the same way but by slightly waving the tip up and down as you draw it away from the base of the leaf:This is a good choice for when you need a really thick leaf (like as a base to hold royal icing flowers on a cake). It's made almost the same as the leaf above, except use a back-and-forth sawing motion with the tip instead of up-and-down.
This elongated leaf is the base for the lily of the valley, which I'll try to do a demo of soon. There's something fairly generic and tropical about it; it would probably look right in a themed cake for everything from a jungle to a swamp. It's made in the same way as the first leaf, except for (obviously) the distance between the base and the tip is significantly extended; when the tip is as long as you need, stop pressure and pull the tip away.
Here's an example of a simple border that can be piped with a leaf tip. It's basically the same hand motion you use for a shell border; move the tip slightly away from you, then boomerang it back over itself. Pull the tip away so each ruffle ends in a small tail. Repeat, repeat, repeat.
This side view shows you about the distance between each ruffle.
Here's a ridiculously thick ruffle, made using the same sawing motion as the second ruffled leaf above; just done to the extreme. This border would please folks who like a little cake with their icing. (P.S. I've seen this method used for piping pot leaves; just stop sawing back-and-forth when the leaf is the length you want and pull the tip away to form the pointed end…)
Don't forget; you can also use leaf tips to pipe flowers, like the tiger lily; the full instructions are here.
One other tip you can use for piping leaves is the Wilton tip #352, which is basically all notch. To form the center vein…
…place one point of the tip on or just above the surface, with the other point at a slight angle to it. Give it a squeeze, and that upper point forms the center vein.This is just a small sampling of the leaves you can pipe; many more to come!


No comments:
Post a Comment