Showing posts with label cupcake topper. Show all posts

Friday, August 24, 2012

Royal Icing Key Lime Pie

Tonight's project is a tiny little key lime pie, which is the official state pie of Florida. All you need to pipe a ridiculously diminutive pie is stiff consistency royal icing in white, brown, and green (to represent the pie pan; might as well keep the color thematic with the pie's interior), a glue stick, parchment paper squares, a flower nail, a Styrofoam block to rest the nail in, and a dusting pouch filled with a 50/50 blend of cornstarch and powdered sugar. You'll also need round tips #12 and #4 and star tip #16. Start by sticking a parchment square to the nail with a dab from the glue stick. 
 Holding the #12 tip at a right angle to and just above the surface, pipe a ring about 1" across. Fill the center of the ring with a dollop of icing…
 …and touch a fingertip to the dusting pouch. Gently tap this shape flat into a disc. Allow it to firm up for at least 10 minutes.
 Using the same or a different #12 tip, pipe a "kiss" of white icing in the middle of the disc. Hold the tip about a quarter-inch above the disc, squeeze out a nickel-sized dollop, then stop pressure and pull the tip away. A peak should remain.
 Pipe a #4 squiggly line of brown icing around the edge to represent the crust. You could stop here…
 …or switch to the #16 star tip to pipe an iconic meringue topping. These would be very cute as toppers on key lime cupcakes, or any other lime or Florida-themed dessert.

Wednesday, August 15, 2012

Royal Icing Beavers

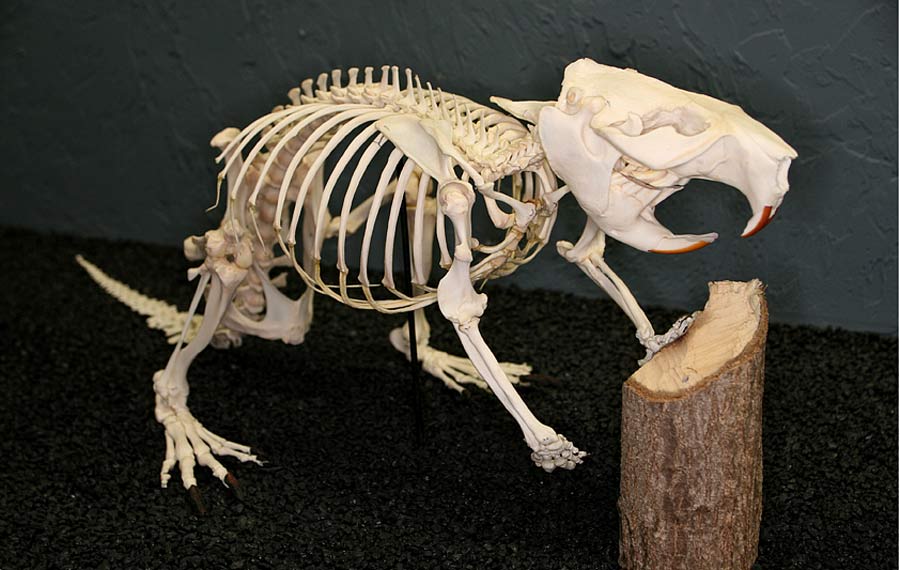
Today's post is a shout out to The Beaver State: Oregon! Beavers already look like balls of icing; just look at a beaver skeleton! This makes them exceptionally easy to render in icing. All you'll need to pipe beavers is stiff consistency brown royal icing, round tips #12 and #5, a glue stick, parchment paper squares, a black food-safe marker like AmeriColor's Gourmet Writers, a flower nail, a Styrofoam block to rest the nail in, and a dusting pouch filled with a 50/50 mix of cornstarch and powdered sugar. Start by sticking a parchment square to the flower nail with a dab from the glue stick. 
 Hold the #12 tip just above the surface and squeeze steadily while slowly moving the tip along for about an inch to form the tail.
 Pipe the body, also with the #12 tip. Start by piping a ball directly on top of the tail shape, then move the tip away at an upward angle while decreasing and then stopping pressure and pulling the tip away. Touch a fingertip to the dusting pouch and tap the icing into this squatty shape. It already looks like a beaver, huh?! Allow it to firm up for a while.
 Switch to the #5 tip to pipe the ears, which are nothing more than dots of icing that you flatten with a fingertip. Pipe four short shots of icing for the legs, gently tapping the ends where they attach to the body with a fingertip to make sure they are firmly adhered.
 The face is basically three black dots from the food-safe marker. If you want to go the extra mile, pipe some yellow teeth with a tiny tip like a round #1. Most photos of beavers don't show huge snarling teeth sticking out, though, and I really wanted this guy to be, just, cute. And his name is Justin.

Thursday, June 28, 2012

Royal Icing Pineapple

I've been thinking a lot about those half-pumpkins that you see around Halloween (they're a cousin to candy corn; one of my perennial favorites). I'm planning to pipe an icing version of those, of course, but I thought I'd better hold off and work on something more seasonal: a pineapple. All you need to pipe a little half-pineapple that would look darling on a cupcake or any small dessert are royal icing in green and yellow (or a more realistic color), a dusting pouch filled with a 50/50 mix of powdered sugar and cornstarch, parchment paper squares, round tips #12 and #5, and oval tip #55 by Ateco. 
Start by piping a shape reminiscent of a Hershey's Kiss in the middle of a parchment square. Hold the #12 tip just above the surface, squeeze until the base is about the size of a dime, then draw the tip slowly upward while maintaining even pressure. Stop pressure and pull away the tip when the shape is about 3/4" high. Touch a fingertip to the dusting pouch and tap the peak into the rounded shape you see here:
 Allow it to firm up for about half an hour. Switch to the #5 tip and cover the shape in tiny little adjacent dots. Hold the tip almost against the surface, squeeze just until you see icing, then pull away to form peaks.
 Cover the entire shape except for the top.
 Use the oval #55 tip to pipe the leaves. Hold the tip just above the surface at a 90 degree angle, squeeze, and pull up. After about 1/3", stop pressure and pull the tip away. If any fall over, you can usually touch a fingertip to the dusting pouch and nudge them back into place.
 These would be especially cute on luau or SpongeBob SquarePants-themed cupcakes; anyplace a little tropical accent is appropriate.

Friday, February 24, 2012

Royal Icing Bird Nests with Eggs

If you need an absolutely adorable cupcake topper or cake decoration, look no further. In fact, I think these sweet little bird nests could be served straight up. Make a batch of royal icing and get set up with a piece of parchment paper taped to a cookie sheet:
Drop a multi-hole tip like the Ateco #234 into a piping bag (Wilton makes a similarly-numbered tip). This is a larger version of the #233, which is useful for piping small-scale grass, fur, hair, flower centers, etc. I wouldn't bother using a coupler for this project:
Load the bag with some brown royal icing. I used AmeriColor Soft Gel Paste in Chocolate Brown:
Set out jelly beans or small malted eggs in groups of three for each nest. No point in fumbling for the right color or sifting out the mutant ones while your icing is drying.
Holding the bag perpendicular to the surface, pipe a circle about 1.5" across. Finish it by spiraling in toward the center. I gave it a little extra "squish" in the center to hold the "eggs" in place:
Nestle the three eggs into the center. You could easily color-coordinate them for some event other than Easter. Being Irish, I'm always looking for new ways to use these colors:
I'd better get started on some royal icing birds to sit on these…