I took the final Wilton Course 3: Gum Paste and Fondant class last night. One of the best parts about Course 3 was I finally learned what the scallop-edged tool contained in the Wilton Ultimate Decorating Set is for. In different places, it's referred to as the Straight Scallop Cutter or the Scallop Ruffle Cutter. Supposedly it can't be bought a la carte, but if you put your mind to it I'll bet you can think of a few ways to get your hand on one if you really needed one and didn't want to buy the whole set. Anyway, it's for adding a scallop-shaped border to long strips of fondant, which can then be ruffled or punched with eyelet holes. To make a border with both, you'll need the scallop cutter, pink shaping foam, a round piping tip #4 or #5, the veining tool from the Wilton 10-piece Fondant & Gum Paste Tool Set, a large surface to roll the fondant out on, a dab of Crisco to slick it up, a fondant roller, water and a brush (or a water brush), a cake to put the border on, and (believe it or not) a box of Wilton Fondant. I've said time and time again, the Wilton fondant tastes so vile that I'd rather eat my own fondant after it's fallen on the floor and been stepped on a few times, but for this project and probably many others like it, the Wilton fondant is appropriate because of its superior malleability, and the fact that it has an unbelievably long period of workability. Besides, you can always peel the border off and send it out to have it destroyed shortly before serving any cake decorated with it. I wasn't able to take many photos of the process of making the actual border during class, but I think I snapped the essentials. First, here's the scallop tool and a #4 tip:
The cutter has open ends, which makes it possible to cut a continuous border as long as your piece of fondant:
First, figure out how long of a piece you'll need by measuring the diameter of the cake. You may need to create the border out of several pieces; just be cautious about not unintentionally putting one of the seams at the front of your cake. Roll out the longest piece of fondant possible; I started with a log and rolled it to about 1/16" with the 9" roller. Once you've cut the border with the scallop cutter (which is basically just making cut after neighboring cut with the edges touching), place a section of it on the pink shaping foam and ruffle the border with the wide end of the veining tool. Place the tool on the edge of the border and pull it towards you while pressing down gently. I also rocked the tool from side to side a bit to really curl up the ruffle. The impressions from the veining tool should overlap slightly.
To reiterate, this is something I could never do with my homemade fondant; I'm pretty sure it would manage to simultaneously stick to itself and dry out.
To make a border around a fondant-covered cake, start by dabbing a bit of water onto the straight edge for a few inches along the border at one end. Press it against the cake and repeat the process for a few inches at a time until you've made it all the way around. Cut the extra away with a knife or whatever tool you have handy and try to smooth the edges together with a fingertip.
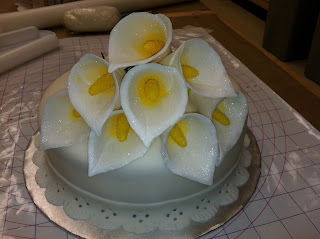
If the edge of your cake wasn't quite perfect, a border like this will cover a multitude of sins, by the way. Finish by decorating any way you like (in this case I made a bunch of gum paste lilies with a cutter that came with the Wilton Gum Paste Flower Cutter Set.
If you know of another similar scallop-edged tool, please write me about it!


This cake looks perfect for Easter - Val K.
ReplyDeleteThanks Val; good call!
ReplyDelete