Saturday, June 23, 2012

Chrysanthemum Nail Experiment

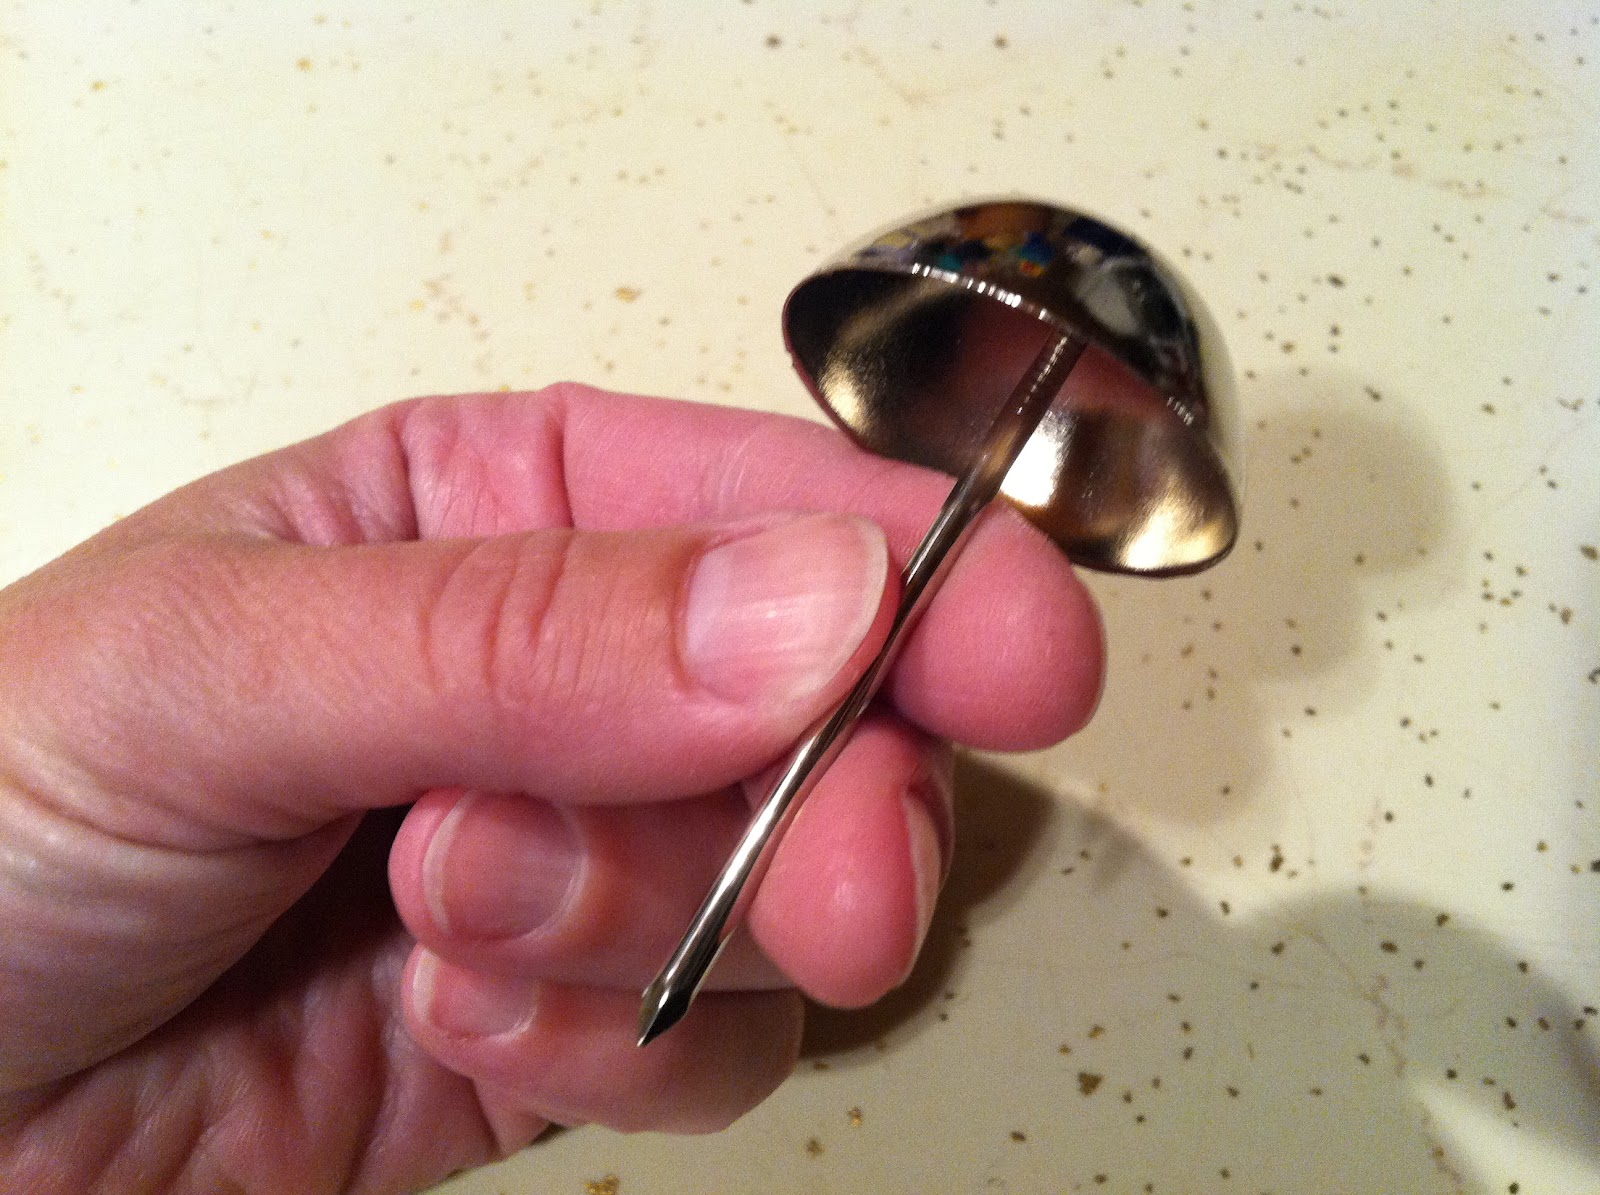
Every so often I'll run across an item in a store that reminds me I've barely scratched the surface on the cake decorating phenomenon. I stupidly thought I knew everything there was to know about flower nails, and then I ran across this bizarre specimen…
 …a hollow dome with a #3 on it (no brand stamped in the metal, nothing). After doing some research, I found out this peculiar looking tool is made by Ateco and is known as a "chrysanthemum nail." In the Ateco catalog, it's listed as 903 (there's also a 906; I'm assuming that one is larger, if the standard numbering convention is any indication).
 I haven't been successful in finding photos of it in action, but I'm guessing that if it's used to pipe chrysanthemums, this tip will be the right one to reach for. It's an Ateco #80, which I used a few months ago when I piped chrysanthemums.
 The point of using a chrysanthemum nail is to skip over the step of piping a base; the dome IS the base. When the flower is dry, it gets popped off the base, which has been greased with a thin layer of Crisco. The upside is you save a bunch of icing and have a flower that is a lot lighter, the downside is you can only pipe one at a time. Other items needed are stiff consistency royal icing, a dusting pouch filled with a 50/50 mix of cornstarch and powdered sugar to touch your fingertip to if you need to nudge any questionable-looking petals into place, and a Styrofoam block to rest the nail in.
 After you've greased the nail lightly with Crisco, pipe the first three stand-up petals. I go a bit more into detail about angle, petal placement, etc. in the original chrysanthemum post.
 Add more petals until the chrysanthemum is the size you want; you could cover the whole nail. It annoys me that I can see the nail through those fluted petals, but it might give the flower a pretty, lacy look if you can see through it to the cake and leaves beneath. Alternately, you could pipe the petals in a much denser pattern.
Set the nail in the Styrofoam until the mum is dry (I gave it five hours; I would recommend overnight). It should pop right off if you gently press your fingertips against opposite sides of the mum while giving the nail a very small twist. If there's any hesitation, it's not ready to come off. I must say, I like the end result, but I definitely prefer piping mums on a standard flower nail.

Friday, June 22, 2012

Royal Icing Acorns

I’m a big fan of all things to do with the forest; some of the first things I figured out how to pipe with royal icing were pine cones and pine needles. Recently I piped a mouse and before I started adding features to it all I could think of when I looked at the body was how much it looked like an acorn. So, today I tried to pipe an acorn on purpose. All that’s needed to pipe acorns are a bag of green royal icing with a round #12 tip, brown icing with a round #3 tip, a dusting pouch filled with a 50/50 mix of cornstarch and powdered sugar, a flower nail, a glue stick, parchment paper squares, and a Styrofoam block to rest the nail in. 
Start by piping a short, squatty teardrop on a parchment square with the green icing (you could use brown, too). Hold the tip at a 45 degree angle, squeeze until you build up a ball, then pull away while decreasing and stopping pressure. Touch your fingertips to the dusting pouch then pinch the tip to neaten it up if need be. 

 Allow this part to firm up for a while (you can speed up the process by placing it under a desk lamp). Dab the glue stick to the flower nail, then stick the parchment square to it (being careful not to squish or otherwise disturb the icing).
 Pipe a cluster of #3 dots, then flatten them slightly with a dusted fingertip, to form the cap.
 Pipe a short stem, also with the #3 tip. Hold the tip against the acorn's cap, and squeeze while pulling away for a few millimeters. Stop the pressure and pull the tip away. If the end of the stem has an unsightly peak, tap it flat with your fingertip.
 Acorns are a perennial favorite in fall decorating, which is upon us if the massive autumnal floral display at Michael's is any indication (of course it's only June at the time I'm writing this). Take a tip from the hoarding habits of the squirrels and start piping acorns NOW; you'll be ready for all the fall and forest-themed cakes you might get called upon to decorate!

Thursday, June 21, 2012

Royal Icing Sunflower

I think the sunflower is one of the easiest yet boldest flowers you can pipe. It's larger than most royal icing flowers; just one would cover an entire cupcake! You'll need larger parchment squares (about 3") and a larger flower nail, a Styrofoam block to rest the nail in, a glue stick, a dusting pouch filled with a 50/50 mix of cornstarch and powdered sugar, stiff consistency royal icing in yellow and brown, round tip #3, and a curved ribbon tip (I used #79 by Magic Tip).
 Start by sticking a parchment square to the nail with a dab from the glue stick.
 Make a dot of icing in the middle of the square to keep your flower centered.
 Hold the tip just above the surface at a 45 degree angle. Pipe two petals opposite each other. Start from the center and radiate out to just inside the edge, at which point you should stop pressure and pull the tip away.
 Touch your fingertips to the dusting pouch, and pinch the ends of the petals into a point.
 Repeat the process…
 …again and again…
 …and again. Don't worry if you don't wind up with exactly 16 petals.
 Touch a fingertip to the dusting pouch again and tap it against the center to flatten out all those raw ends.
 Allow the flower to firm up for about 15 minutes. Pipe a cluster of #3 short stand-up dots. Hold the tip against the center of the flower, squeeze briefly while drawing the tip upwards for about 2 millimeters, stop pressure and pull the tip away. If any of the dots are especially taller than the others, touch a finger to the dusting pouch and tap them down. Allow this flower ample time to harden; the drying time can be sped up by placing it under a desk lamp. This is a great flower for decorating cakes all the way from summer through fall!

Wednesday, June 20, 2012

Royal Icing Cactus

I've been meaning to try my hand at piping some desert-inspired decorations, so naturally I started with a cactus. To pipe cacti, you'll need stiff consistency green icing in a bag fitted with a #8 tip and a coupler, white icing in a bag fitted with a round #1 tip (thinner consistency than "stiff" is ideal when using a #1 tip), a dusting pouch filled with a 50/50 blend of powdered sugar and cornstarch, several pre-made drop flowers (unless you have the mad skills needed to pipe flowers directly on the finished cacti), a #2 tip…
…and a piece of parchment paper taped to a cookie sheet. 
 Start by piping a line of icing with the #8 tip. If there's a peak left when you stop the pressure and pull the tip away, touch a fingertip to the dusting pouch and tap it down.
 Pipe the "arms" of the cactus. To pipe the one on the right, I held the tip against the right side of the center line and piped a "J". The arm on the left is overlapping onto the center line, just to give the cactus some depth. Set the cacti to dry for about an hour (you can speed up the drying time by placing them under a desk lamp).
 Pipe some drop flowers and allow them to dry.
 Switch the tip on the green bag to the round #2. Pipe a dot onto the backs of a few flowers…
 …and stick them on. As you've probably imagined, this exact species of cactus exists only in my mind; I might have taken some artistic/scientific liberties with its design.
 Pipe some "spines" with the white icing and the #1 tip. Allow the cacti to dry overnight, then plant them on any desert- or Southwestern-themed cake (or even a cake celebrating water conservation). They'd look great surrounded by brown sugar sand!


Tuesday, June 19, 2012

Royal Icing Cattails

Yet another project in the "pond" collection (sounds more appetizing than "swamp", right?), to be company for the frog, lily pads, and water lily. All you need to make cattails are Nilla Wafers, a Styrofoam block, a dusting pouch filled with a 50/50 mix of cornstarch and powdered sugar, stiff consistency brown and green royal icing, round tip #8, leaf tip #352, and dry linguine (spaghetti would probably look more realistic, but I didn't have any on hand). 
 Start by piping a line about 2" long on one side of the linguine. Leave about half an inch bare at the end.
Pipe another line on the other side of the linguine directly opposite it. 
Dust your fingertips especially thoroughly against the dusting pouch and pinch the icing together around the linguine. 
 
Re-dust your fingertips and tap along the seam until it disappears. Don't worry about making the cattails look perfect; last I checked, they aren't perfectly cylindrical in nature, either. 
 Stick the cattails into the Styrofoam block to dry.
 Pipe a cluster of stand-up #352 leaves on a Nilla Wafer. Hold the tip against the cookie's surface, squeeze, then pull upwards. Stop pressure and pull the tip away when the icing is able to stand up on its own (or be propped up by one or more of its neighbors).
 Carefully stick the cattails into the cookie. Hold the linguine as close to the base as possible to lessen the probability of snapping it in half.
 Arrange them as you see fit, then when you place the cattail arrangement on a cake, pipe some more leaves around the base for your swamp (er, pond) creatures to hide in.

Monday, June 18, 2012

Royal Icing Strawberries

Is it silly to make strawberries out of icing when you could pretty much use the real thing as a cupcake topper? In my book (and I do intend to write one): NO. Strawberries are one of the most watery fruits around, and they would probably cause any cupcake to melt down prematurely. Not only that, but strawberries growing out of the ground don't come in hot pink (yet). So, to pipe royal icing strawberries, you'll need a dusting pouch filled with a 50/50 mix of powdered sugar and cornstarch, parchment paper squares, round tips #12, #1, and #2, Ateco leaf tip #65, a flower nail, a glue stick, a Styrofoam brick to stick the nail in while changing tips, and stiff consistency royal icing in yellow, green, and hot pink (or red, if you're a traditionalist). 
 Start by piping a teardrop on a parchment square for each berry. Hold the tip just above and almost parallel to the surface, squeeze firmly to form a ball, then move the tip away and across the paper while rapidly decreasing and then stopping pressure. Pull the tip away. Touch a fingertip to the dusting pouch, then gently tap the peak into a rounded end.
 Allow the berry to dry for about half an hour. You can speed up the drying time by placing it under a desk lamp. Pipe short, yellow shots with the #1 tip for "seeds" (keep them as random as possible; not in rows).
 Pipe a #65 leaf or two…
 …and a #2 stem.
 First grapes, now strawberries; this is as close to a health food kick as I've been in a long time!