Showing posts with label Christmas. Show all posts

Wednesday, December 26, 2012

Royal Icing Yule Log

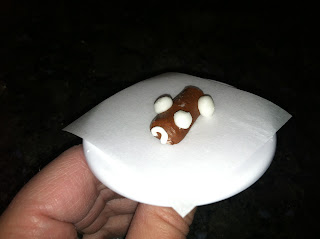
Tonight's post is a ridiculously tiny Yule log; it's not even a Yule stick! If you'd like to see the other time I ventured into this type of thing, check out my Yule Stump (it has links to all the various elements like meringue toadstools and royal icing pine cones and needles). This mini Yule log starts life as a Royal Icing Ho-Ho; basically an inch-long line of brown icing piped from a #12 round tip, with a spiral of white icing piped at both ends with a #2 tip. 
 Pipe the mushroom caps with white icing and a #8 tip. Flatten them slightly with a fingertip after touching it to a dusting pouch filled with a 50/50 mix of powdered sugar and cornstarch.
 Sprinkle them lightly with cocoa powder.
 Pipe a few tiny green leaves with a #65 tip.
 Add a few red berries with a #3 round tip.
 Lastly, sprinkle some "snow" from your dusting pouch. A perfect dessert for your gingerbread family or perched atop a cupcake or petits fours!

Saturday, December 22, 2012

Royal Icing Kissing Ball

It's easy to pipe a fairly realistic-looking sprig of mistletoe, but you could also go the route of piping a mistletoe "kissing ball." All you'll need is stiff consistency royal icing in green, white and red, round tips #12 and #3, leaf tip #65, oval tip #55, a flower nail, a Styrofoam block to rest the nail in, parchment paper squares, a glue stick, and a dusting pouch filled with a 50/50 mix of powdered sugar and cornstarch. Start by sticking a parchment square to the flower nail with a dab from the glue stick. 
 Hold the #12 tip just above and at a right angle to the surface and pipe out a kiss-shaped dollop of icing about half an inch tall. Touch a fingertip to the dusting pouch and tap the peak to round it. Set it aside and allow it to dry.
 Switch to the #65 tip and start covering the icing with tiny, overlapping leaves.
 Continue until you can no longer see the base.
 Allow the icing to firm up a bit and pipe a scattering of white #3 dots for berries (you could also use red for holly berries).
 Pipe a bow with the #55 tip in any color you like (red or white are fairly traditional). I really have no directions for the bow; just pipe a couple of loops, a short shot of icing for the knot in the middle, and a couple of tails.
 Peel away the parchment when the icing is dry and use this to make any holiday dessert that much more festive. You could also use a dab of icing to hang this kissing ball over the door of your gingerbread house.

Thursday, December 20, 2012

Royal Icing Loopy Bow

Loopy fondant bows are easy to make, and loopy royal icing bows are even easier! All you'll need is stiff consistency royal icing in any color, oval tip #57, round tip #12, a cookie sheet lined with parchment paper, a flower nail, parchment paper squares, a glue stick, and a Styrofoam block to rest the nail on. Start by taping a sheet of parchment paper to the cookie sheet. 
 Pipe dozens of 1/2" "teardrops" with the tip #57. Allow them to firm up for an hour or two.
They're ready for action when they can be removed easily from the paper by sliding an offset spatula underneath them. 
 
Stick a parchment square to the flower nail with a dab from the glue stick.
 Switch to the #12 tip and pipe a spiral of icing about 1/2" wide and a little over 1/2" tall.
 Quickly, before the icing has  chance to dry, stick as many loops into the icing as you can. Angle them in all different directions. Work from the base up. I was able to fit 6 loops around the base and then tucked in another 8 above.
 Peel away the parchment square when the icing is dry, and use this loopy bow to instantly add more height and festivity to any cupcake, Rice Krispy Treat, brownie, etc!

Friday, December 14, 2012

Royal Icing Christmas Stocking

Tonight is a tribute to one of my favorite Christmas rituals: stuffing Christmas stockings. Everyone from my kid to my cat gets a stocking on Christmas morning. Here's what you'll need: stiff consistency royal icing in any colors you like, a tip #12 for each color (or be prepared to do some washing), a flower nail, a glue stick, parchment paper squares, a Styrofoam block to rest the nail in, and a dusting pouch filled with a 50/50 mix of powdered sugar and cornstarch.   
 Hold the #12 tip just above and at a right angle to the surface. In one motion, pipe a shape like a slightly curvy "L", then reverse the direction when you reach the "toe" and continue back up to the top where you started.
 Touch a fingertip to the dusting pouch and tap the icing flat and smooth.
 Pipe the cuff in a similar fashion; the basic shape is a zero lying on its side. You don't have to pipe the icing as smooth with the cuff; if you pulse the pressure as you pipe you can give the surface a lumpy, "furry" appearance. I sprinkled on some extra powdered sugar; it looks sort of snowy. Alternately, you can switch to a small round tip like a #2 and pipe many short peaks of icing for fur; I may give this a try after the white icing firms up more. You can, of course, decorate the stocking any way you like with edible glitter, pearl dust, stitching, tiny holly leaves, etc. In any event, it makes a cute cupcake topper or decoration for a gingerbread house or cookie.

Tuesday, December 11, 2012

Royal Icing Igloo

A royal icing igloo is so ridiculously easy to pipe, you don't even need a tip for the main part of it! All you'll need is a coupler on a pastry bag (an Ateco coupler, though; Wilton's coupler has a notch), white stiff consistency royal icing, a #79 scallop tip to pipe the door, a flower nail, parchment paper squares, a Styrofoam brick to rest the nail in, and a dusting pouch filled with a 50/50 mix of powdered sugar and cornstarch. Start by sticking a parchment square to the flower nail with a dab from the glue stick. 
 Hold the coupler (without a tip) at a right angle just above the surface and squeeze out a "kiss" of icing while moving the tip upward for about half an inch. Stop pressure and pull the tip away.
 Touch a fingertip to the dusting pouch and gently tap down the peak to round the shape into a dome. Allow it to firm up for a few minutes.
 Switch to the #79 tip and hold it against the side. Squeeze while moving it away and along the surface for a few millimeters. Stop pressure and pull the tip away. Gently even out any ragged edges of the door with a dusted fingertip. That's all you need to pipe tiny decorations for your North Pole-themed desserts!

Monday, December 10, 2012

Royal Icing Narcissus

The narcissus has always been one of my favorite flowers (definitely my favorite bulb). It is the official flower of December, but is frequently overshadowed by poinsettias. They are easy to pipe, especially if you use a daffodil template on your flower nail (optional, if you're skilled at keeping the 6 petals equal in size): 
 You'll also need a Styrofoam block to rest the nail in, a glue stick, parchment paper squares, a dusting pouch filled with a 50/50 mix of powdered sugar and cornstarch, petal tip #104, scallop tip #79, and stiff consistency royal icing in white and yellow. Start by sticking a parchment square to the flower nail with a dab from the glue stick.
 Attach the #104 tip to the white icing. Hold the tip almost flat against the surface, but with the narrow end of the tip angled outwards and upwards. Squeeze while moving your hand in a tight "U". As you complete the shape, stop pressure and pull the tip away diagonally toward the center of the nail.
 Here are the first two petals. As you pipe them, touch your fingertips to the dusting pouch and taper the petals' tips by pinching them gently.
 Here are the 6 petals. Set the flower aside to firm up for a few minutes at this point.
 Attach the #79 tip to the yellow icing. Pipe a stand-up petal in the center; hold the tip against the surface at a right angle, squeeze, draw upwards for a few millimeters, then stop pressure and pull the tip away.
 Repeat a few times until you've formed the center cup of the narcissus. Sneak in a few of these next time you're supposed to be piping poinsettias; see if anyone notices!

Sunday, December 9, 2012

Royal Icing Poinsettia

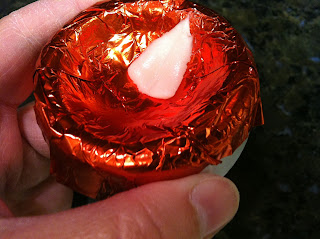
Poinsettias are very easy to pipe, but they take a long time to dry; make sure to plan ahead if you're going to use them to decorate a cake for Christmas! You'll need stiff consistency royal icing in green, yellow, red or white, leaf tip #70, round tips #2 and #3, and a dusting pouch filled with a 50/50 mix of powdered sugar and cornstarch. You'll also need a small flower forming cup and a square of candy foil for each poinsettia. 
 Line the cup with the foil and tuck it around underneath.
 Attach the #70 tip to the white or red icing. Hold the tip in the center and squeeze out a petal.Touch your fingertips to the dusting pouch and taper the tip of the petal.
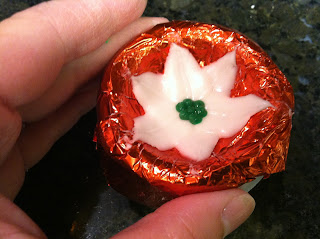
 Repeat several times to make the flower. I like to start by piping three equilateral petals. Try not to pipe an excessive amount of icing in the center or it will take a week to dry, depending on your climate.
 Six petals or so is a good number.
 Pipe a cluster of green dots in the center with the #3 tip.
 Allow the green dots to dry for a few minutes, then top each one with a dot of yellow piped from the #2 tip. You can gently remove the flower on the foil from the cup so you can use the cup to pipe more flowers. Set the foil with the flower on it aside in a warm, dry location. Don't peel away the foil until the icing is completely dry.

Tuesday, November 27, 2012

Royal Icing Mittens

Here's a cute accompaniment for yesterday's Santa hat; in fact, it uses the same icing colors and tips (round #12 and #8). You'll also need parchment paper squares, a flower nail, a glue stick, a Styrofoam block to rest the nail in, and a dusting pouch filled with a 50/50 blend of powdered sugar and cornstarch. Start by sticking a parchment square to the flower nail with a dab from the glue stick. 
 Hold the #12 tip just above and at a right angle to the surface. Squeeze while moving the tip along for about half an inch. Stop pressure and pull the tip away. This is the thumb.
 This time, move the tip in an upside-down "U" motion. Touch a fingertip to the dusting pouch and tap the line in the center to smooth out the icing.
 Repeat, if you'd like to do a pair of mittens. Why not?
 Pipe the cuffs in a contrasting color with the #8 tip. Pulse the tip while you pipe (move your hand back and forth subtly and rapidly) to give it some texture; it almost passes for "fluffy"!