
One of the only gum paste flowers to be covered in Wilton's Course 2:
Flowers and Cake Design is the pansy (the other one is the Play-Doh-esque
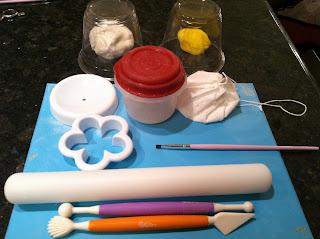
Button Flower). If you've never played around with gum paste, the pansy is a good candidate because 1) the supply list is relatively short, and 2) the end result actually almost looks like a flower found in nature. You'll need at least two colors of gum paste (one should be yellow, for the center) which should be stored under plastic cups to keep them from drying out while you're working with them, Crisco (to knead into the gum paste if it's drying out), a container of gum glue adhesive (a pinch of gum paste dissolved in a tablespoon of water), a small brush, a dusting pouch filled with a 50/50 mix of powdered sugar and cornstarch, a pansy cutter (any 5-petal cutter will do), the knife and ball tools from
Wilton's 10-piece Fondant and Gum Paste Tool Set, a 3" flower forming cup for each pansy, a gum paste storage board (use the back side for your work surface), and a 9" fondant roller. You'll also need thick and thin pink shaping foam. You might also want
Color Dust (in particular, Purple) to add detail to the petals.
Start by dusting the back side of the storage board.
Roll out some gum paste; it should be paper-thin. You might find you need to regularly dust it to keep it from sticking to the roller.
Cut out two flower shapes for each pansy. Store one of them under one of the storage board's clear plastic sheets.
Place the other cutout on the thin pink foam.
Run the large end of the ball tool around each of the petals to thin and slightly ruffle them. The ball should be more on the foam than on the petal.
Move the cutout to the thick pink foam, and cup each petal with the large end of the ball tool; press down in the center of the petal, then slide the tool toward the center, decreasing pressure as you go.
Place this cutout in a flower forming cup. Remove the other cutout from storage. Use the knife tool to cut off two adjacent petals. The remaining three can go back under the plastic cup.
Use the knife tool to cut the two petals apart:
Use the ball tool in the same way on these petals to thin, ruffle, and cup them.
Use the brush to dab a small amount of gum glue to the underside of each of the two petals…
…and attach them like this. They should be slightly fanned out from each other, and not stacked directly on top of the petals beneath them, to add depth.
To finish the pansies, attach a small loop of yellow gum paste with a dab of gum glue. I found I had the best luck forming this loop by rolling a tiny log of gum paste between a fingertip and the palm of the opposite hand. Carefully pinch a loop less than half an inch in length, and stick the tip of it right between where the two single petals' tips meet.
If you want to add color to the pansy, apply Color Dust with a narrow angled brush, emanating from the center in short strokes first…
…and then add the loop.
Think of all the colors pansies come in; you could make these out of almost any shade of gum paste! If you're especially fond of pansies, take a look at
the ones made from royal icing (one of my favorites to pipe).


Thanks for the tutorial, it was helpful to know when doing ruffle to be more on foam than petal.
ReplyDeleteFantastic just what i was looking 4 so simple!!!!!
ReplyDelete