Showing posts with label Ateco. Show all posts

Thursday, July 19, 2012

Ateco Star Tip #33

One of the things I find most annoying about most so-called "star tips" is the star they pipe is 6-pointed. I actually flinch when I see Fourth of July desserts depicting the American Flag featuring this abomination. The only thing that's worse is when the dessert winds up being pink, white and blue because whoever created it didn't do their homework to figure out how to make red. Anyway, I discovered the Ateco Tip #33 right after this year's Fourth of July, so I'll have to wait almost a whole year to press it into service in that capacity. As you can see, it has five points; no more, no less:
 Here's what a single star looks like. Hold the tip at a right angle just above whatever surface you're going to pipe on (in this case, a Nilla Wafer). Squeeze until the star forms, stop pressure, and pull the tip straight up and away.
 When piping a shell border, you can hold the tip so that there is one ridge in the center…
 …or two (in the case of the shell on the right).
I totally covered the surface of a Nilla Wafer with tip #33 stars. If I'd used white icing, it could have been a dandelion! Next time…

Sunday, July 8, 2012

Piping Roses with Star-Cut Tip #64

I found an unusual tip this weekend: the Ateco #64, which is considered a star-cut tip. It's a curved petal tip (like you use for piping violets), but it has a couple of teeth carved into the inner curve by the narrow end. The teeth cause whatever you pipe to have a ridge:
I can imagine this tip being useful for borders and swags, but I wanted to try piping a rose with it (only because it looks so much like a violet tip). I started by piping the rose bases in advance and allowing them to firm up. Go here to see why this step is important. 
 Dab a glue stick to a flower nail, then carefully place one of the bases on. If it comes off the paper, stick it back down with a dot of icing.
 I'm not going to bore you with details of how to pipe the petals; I'll let Wilton do that. ;) Seriously, I go sort of nuts thinking about all the angles, hand positions, number of petals, etc. that are involved in piping roses. The basic thing you need to do is pipe a center wraparound petal…
 …and then pipe as many petals as you need to sufficiently cover the base. The petals should overlap, be staggered (not be in vertical rows), and angle increasingly outwards from the base as you reach the parchment.
 Generally, when you've piped the base with the round #12 tip, you can fit on 3 rows of petals beyond the first wraparound petal. The rows might consist of 3, 5, and 7 overlapping petals.
As you can see, these look more or less like traditional roses, but with a grooved edge. This might be the perfect variation for you, if you're tired of piping roses that look like everybody else's. Try piping roses with other non-traditional tips! 


Sunday, June 24, 2012

Royal Icing Gerbera Daisy

When I first started writing this blog six months ago on December 31st, 2011 as a New Year's Resolution, I really had no idea how many people might read it, if any. I never thought I'd reach a page view number in the 5 digits (or if I did it would take years to do). Well, today The Iced Queen had its 30,000th page view, and in honor of this big number, I piped a big flower: a gerbera daisy. To pipe a big flower, you need big parchment paper squares, and a big flower nail; I used an Ateco 914, which is 3" across:
You also need a dusting pouch filled with a 50/50 blend of powdered sugar and cornstarch, stiff consistency royal icing in two bright colors, a glue stick, petal tip #104, and round tip #5.
 Start by sticking a 3" parchment square to the nail with a dab from the glue stick.
 Make a dot in the middle of the square to help keep your petals centered.
 Pipe about 16 petals with the #104 tip that start in the center and radiate outwards, almost to the edge of the nail. Hold the wide end of the tip at the center with the narrow end aimed toward the outer edge. Hold the tip almost flat on the surface, with the narrow end slightly higher.
 As you pipe outward, increase pressure only at the outer edge to build up the curved edge. Decrease pressure as you move the tip back in to the center.
 Rotate the nail and pipe more petals. I like piping them at 12 and 6, then 9 and 3 to keep the flower balanced.
 Pipe 4 more petals in between them…
 …and another petal in between each of these for a total of 16 (or thereabouts).
 Here is a side view; you can see the jaunty upward angle of the petals' edges from here.
 Tap a fingertip to the the center to flatten out the beginnings and ends of the petals. Set the flower aside to firm up before piping the center (it will smooth out a little on its own, too).
Pipe a cluster of #5 pull-up dots in the center. Hold the tip just above the surface of the flower's center, squeeze, pull the tip up about 2 millimeters, stop pressure, and pull the tip away. If any of the dots are significantly taller than the others, you can touch a fingertip to the dusting pouch and flatten them slightly. Give the parchment a gentle tug to remove the flower from the nail. Allow the gerbera daisy ample time to dry before you peel away the parchment paper; you can speed up the drying time by placing it under a desk lamp. 
Thanks to all of you who have contributed to this blog's 30,000 views thus far; keep piping! 
P.S. That's my shower curtain in the background. 

Saturday, June 23, 2012

Chrysanthemum Nail Experiment

Every so often I'll run across an item in a store that reminds me I've barely scratched the surface on the cake decorating phenomenon. I stupidly thought I knew everything there was to know about flower nails, and then I ran across this bizarre specimen…
 …a hollow dome with a #3 on it (no brand stamped in the metal, nothing). After doing some research, I found out this peculiar looking tool is made by Ateco and is known as a "chrysanthemum nail." In the Ateco catalog, it's listed as 903 (there's also a 906; I'm assuming that one is larger, if the standard numbering convention is any indication).
 I haven't been successful in finding photos of it in action, but I'm guessing that if it's used to pipe chrysanthemums, this tip will be the right one to reach for. It's an Ateco #80, which I used a few months ago when I piped chrysanthemums.
 The point of using a chrysanthemum nail is to skip over the step of piping a base; the dome IS the base. When the flower is dry, it gets popped off the base, which has been greased with a thin layer of Crisco. The upside is you save a bunch of icing and have a flower that is a lot lighter, the downside is you can only pipe one at a time. Other items needed are stiff consistency royal icing, a dusting pouch filled with a 50/50 mix of cornstarch and powdered sugar to touch your fingertip to if you need to nudge any questionable-looking petals into place, and a Styrofoam block to rest the nail in.
 After you've greased the nail lightly with Crisco, pipe the first three stand-up petals. I go a bit more into detail about angle, petal placement, etc. in the original chrysanthemum post.
 Add more petals until the chrysanthemum is the size you want; you could cover the whole nail. It annoys me that I can see the nail through those fluted petals, but it might give the flower a pretty, lacy look if you can see through it to the cake and leaves beneath. Alternately, you could pipe the petals in a much denser pattern.
Set the nail in the Styrofoam until the mum is dry (I gave it five hours; I would recommend overnight). It should pop right off if you gently press your fingertips against opposite sides of the mum while giving the nail a very small twist. If there's any hesitation, it's not ready to come off. I must say, I like the end result, but I definitely prefer piping mums on a standard flower nail.

Sunday, June 10, 2012

Royal Icing Bacon and Eggs

The small angled chisel tip #264 by Ateco is one of those I never thought I'd find a use for. That is, until I recently stuck it on a piping bag, gave it a squeeze, and thought the resulting extruded icing bore more than a slight resemblance to bacon. Which brings me to today's post: royal icing bacon and eggs. You'll need parchment paper squares, a dusting pouch filled with a 50/50 mix of powdered sugar and cornstarch, round tips #12 and #8, tip #264, and royal icing in white, yellow and red. If you really want to get realistic with the bacon, stripe the red bag with white and/or pink. Start by loading the white bag with the #12 tip. Hold it just above a parchment square and squeeze while moving randomly to create the free-form edge of the egg's white. 
 Piping the bacon is easy; just attach the tip #264 to the red icing and squeeze firmly. To most, it will look like nothing more than a ruffly red ribbon, but I think its close proximity to that very realistic-looking egg really sells it as bacon.
 When the white has firmed up a bit, pipe the yellow yolk using the #8 tip. Tap down any peak that forms by touching a fingertip to the dusting pouch then tapping it to the peak to round it off.
Use these decorations to spruce up breakfast pastries, muffins, pancakes, whatever, in a most unexpected way. 

Thursday, June 7, 2012

Royal Icing Bunnies

I wish I would have thought about piping bunnies last Easter! Oh well; I guess I'm planning ahead for next year. For now they can be company for the mice. To pipe a bunch of bunnies you'll need stiff consistency royal icing in white, deep pink, and light pink (or whatever color you want the bunnies to be), a dusting pouch filled with a 50/50 blend of powdered sugar and cornstarch, a parchment paper square for each bunny, round tips #12, #1, and #4, and oval tips #57 and #55 (by Ateco), and a black Gourmet Writer by AmeriColor
Using the #12 tip, pipe an egg for the body. If a peak remains like this when you stop the pressure and pull the tip away, touch a fingertip to the dusting pouch and tap the peak down. Allow the body to firm up for about 15 minutes, so it doesn't collapse under the weight of the…
 …head. Pipe a ball, and tap the peak down.
 It should be smooth and round. You could gently taper it with your fingertips, if you like; that would probably make it look more like a real rabbit.
 Switch the tip to the larger oval (#57) and pipe some ears, when the heads have had a chance to firm up. Some of the bunnies wound up being lops, and some are whatever the opposite of lops are.
 Switch to the small oval # 55, and pipe some hind legs. These are pretty minimalist, but I think anyone looking at them will get the idea that they're legs. Again, tap out any peaks left by the tip that look out of place.
Use the same tip to pipe some tiny little forelegs, as well. 
 Switch to the white icing and pipe some little #4 ball tails.
 For the faces, I piped #1 dot noses with deep pink icing so the nose would have some depth, and then drew in their eyes with the tip of a Gourmet Writer. The final step is to build a house out of fondant and recreate scenes from the woefully-ignored creature feature "Night of the Lepus." 


Friday, June 1, 2012

Drop Flowers

I'm not what you'd call a huge fan of drop flowers; there's something so prefab about them. Basically, you hold a tip perpendicular to whatever surface you're going to pipe on, squeeze out a flower while either holding the bag still or rotating it, and then add one or more dots or a star to the center. They don't have a lot of individuality. However, they're easy to crank out, and if you need 350 icing flowers to festoon an old-school wedding cake, they're probably the right flower for you unless you have nothing but time on your hands. 

The Wilton book from 1986, The Uses of the Most Popular Decorating Tips, has an amusing passage that might lead one to believe that some sort of snobbery about drop flower tips exists: "True drop flower tips have a center rod within the cone-shaped tip. This pipes a ring of petals with an open center." Be that as it may, you can pipe drop flowers with regular star tips, and I don't think the effect is different enough to be noteworthy. Here are three "true drop flower tips" though, according to the Wilton book: 
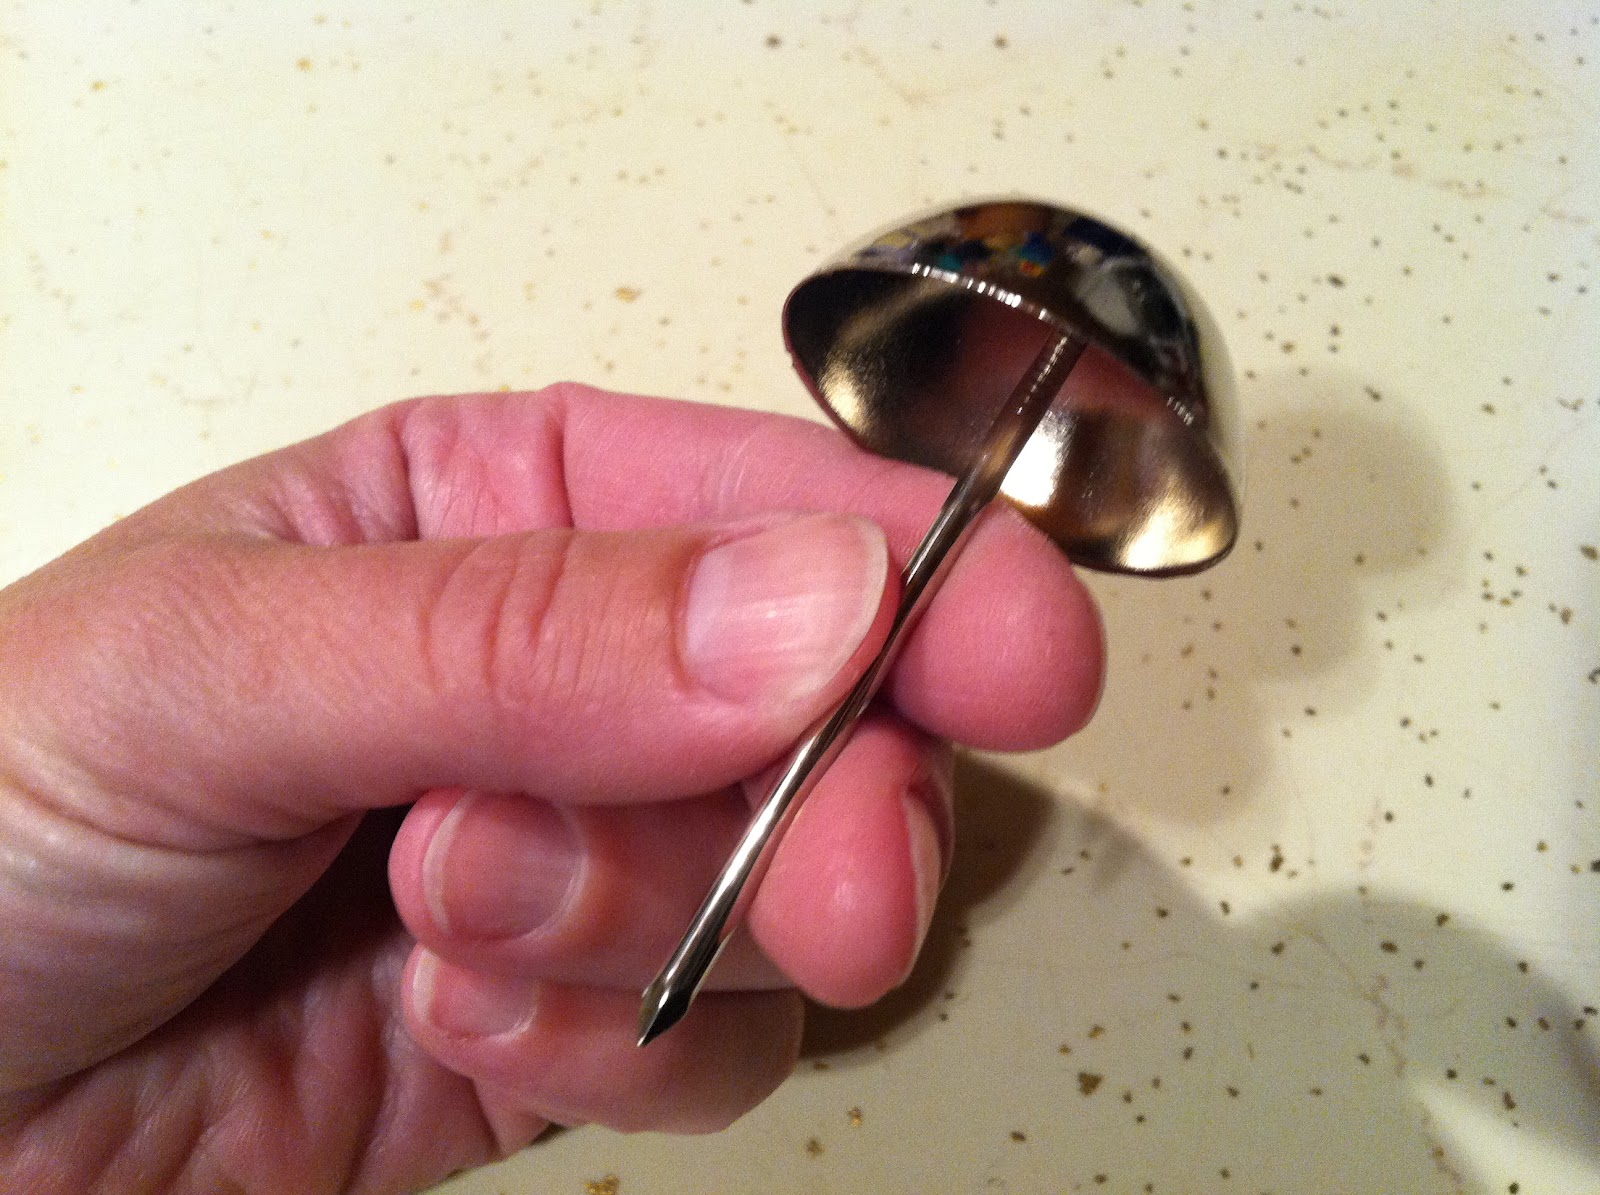
 Can you see the nail inside? That part where it's welded to the side collects icing like nobody's business. Be sure to clean it thoroughly when you're washing your tips (that's why you'll need this brush or one like it).
When you attach the tip to the coupler, line up the nail with that notch on the side, and it won't rotate around. Now you know what that notch is for, if you didn't already. 
 You can pipe drop flowers on a piece of parchment paper taped to a cookie sheet if you're making a lot of them…
 …or directly on cookies or something else, if you're just practicing.
 Hold the tip at a right angle with the tip touching the surface, and squeeze. My collection of tips that will pipe drop flowers is by no means exhaustive, but I'll show you a few that stand out.
 These first flowers were made with an Ateco #106. I rotated either the cookie or my wrist to form the curved petals.
 I gave all of the flowers in this post a center dot piped with a round #2 tip.
 These were piped with a Wilton #21 star tip held still…

…and these were piped with a twist. 

These were piped with an Ateco #96:
These were piped with a Wilton #224:

These larger flowers were piped with a Magic Tip #191:
And lastly, these tiny daisy-like flowers were piped with a Wilton #16, a small star tip rotated…
…and held straight. 
You can pipe drop flowers in buttercream directly on a cake, but I prefer piping them in royal icing on parchment, letting them dry, and then relocating them (or piping them directly on cookies, of course).