Showing posts with label cupcake. Show all posts

Sunday, December 23, 2012

Royal Icing Bunny Slippers

Tonight's post is an homage to "A Christmas Story"; how many of you list that among your favorite holiday films? All you'll need to pipe tiny little bunny slippers just like Ralphie's are stiff consistency royal icing in pink, round tip #12, leaf tip #352, a flower nail, parchment paper squares, a glue stick, a Styrofoam block to rest the nail in, a dusting pouch filled with a 50/50 mix of powdered sugar and cornstarch, round toothpicks, and black food coloring, like AmeriColor's Soft Gel Paste. Start by sticking a parchment square to the flower nail with a dab from the glue stick. 
 Hold the #12 tip just above and at a right angle to the surface. Pipe out a couple of elongated "bean" shapes, curving slightly in the middle and with the ends wider than the center. Touch your fingertip to the dusting pouch and then finesse the icing into shape, if need be. Allow these shapes to firm up for a few minutes.
 Hold the tip at a 45 degree angle and just above and behind one of the ends. Squeeze out a ball of icing, then move the tip along for a few millimeters. Stop pressure and pull the tip away.
 Tap down the peaks with a dusted fingertip. Allow the icing to firm up for a few minutes.
 Hold the #352 tip against the head (with one of the pointy sides facing toward the front of the slipper) and pipe out an ear while moving the tip upward for about half an inch. Stop pressure and pull the tip away. Use a dusted fingertip to adjust the ears so they lop over.
 Pipe the eyes with #3 dots of white icing. Flatten them slightly with a dusted fingertip.
 When the white icing is firm, dab on pupils of black food coloring with the tip of a round toothpick that you've smashed against your countertop.
 Paint on a tiny triangular nose with the other pointy end of the toothpick. Sorry; tomorrow's tutorial won't be for a leg lamp or a Red Ryder BB Gun!

Thursday, November 8, 2012

Royal Icing Peapod

I was reading about the first Thanksgiving and was surprised to find that peas were supposedly on the menu; they don't get nearly the amount of historical credit that pumpkins and maize do. All you need to pipe a sweet little peapod are stiff consistency royal icing (I used Avocado by AmeriColor; a color I haven't used since I made those gum paste artichokes), round tip #12, leaf tip #69, tip #61 by Bakery Crafts (a teardrop shaped tip used primarily for piping violets), a flower nail, a Styrofoam block to rest the nail in, parchment paper squares, a glue stick, and a dusting pouch filled with a 50/50 mix of powdered sugar and cornstarch. Start by sticking a parchment square to the flower nail with a dab from the glue stick. 
 Hold the tip at a right angle and against the surface, and pipe a gently curved shape to form half of the peapod.
Here's another view of it. 
 Repeat to form the other half.
 Pipe as many peas in whichever size you wish. I was able to fit three peas with tip #12. Hold the tip just above and at a right angle to the center line, squeeze briefly, and pull up and away while stopping pressure.
 Touch a fingertip to the dusting pouch and tap the peaks down into balls.
 You could stop here or add a leaf or two if you like; make sure they're firmly anchored to the pod. I used a #69 leaf tip. I think these would be sweet cupcake toppers for a baby shower in anticipation of multiple births; tiny faces could be drawn on with food-safe markers like AmeriColor Gourmet Writers, and the peas could be piped in whatever skin tone you like.

Friday, October 26, 2012

Royal Icing Mummy Face

There sure are a lot of variations on the mummy cupcake; do a Google image search and see what you come up with! Here's how to make a tiny mummy face, suitable for petits fours, flat-sided cake pops, mini cupcakes, whatever; you could even pipe them directly on Nilla Wafers. You'll need stiff consistency royal icing in white, black, and whatever color you want for the eyes, round tips #3, #8, and #12, ribbon tip #44, a flower nail, a Styrofoam block to rest the nail in, a glue stick, parchment paper squares, and a dusting pouch filled with a 50/50 mix of powdered sugar and cornstarch. Start by sticking a parchment square to the flower nail with a dab from the glue stick. 
 Hold the #12 tip just above and at a right angle to the surface and pipe a ring with the black icing. Touch a fingertip to the dusting pouch and tap the icing into a disc. Allow it to firm up for a few minutes.
 Pipe two dots of yellow (or whatever color) icing with the #8 tip. Flatten them slightly with a dusted fingertip.
 Switch to the #3 tip on the black icing and pipe two dots for pupils. Piping the bandages with the #44 tip requires no instruction; pipe them any way you like. I figured I'd start around the eyes, slightly overlapping them.
 Continue piping strips of white icing until the black is covered. Don't worry too much about asymmetry, ragged edges, etc. When the icing is dry, peel away the parchment and stick this spooky face on any ghoulish dessert you can come up with!


Monday, October 22, 2012

Royal Icing Pumpkin

As a resident of Half Moon Bay (the Pumpkin Capital of California) I know there are probably countless ways to pipe pumpkins; anyway, here's how I did this one. You'll need stiff consistency royal icing in orange (or white) and brown, a flower nail, parchment paper squares, a Styrofoam block to rest the nail in, a glue stick, and a dusting pouch filled with a 50/50 mix of powdered sugar and cornstarch. You'll also need round tip #12 and quatrefoil-shaped tip #83 (the only other time I've used this tip was to pipe chili peppers): 
Start by sticking a parchment square to the flower nail with a dab from the glue stick. 
 Hold the #12 tip just above and at a 45 degree angle to the surface. Pipe this shape while rotating the nail. It's basically a #8 without the intersection. Try to make the sides symmetrical, but if they aren't, that's OK; pumpkins rarely are in real life.
 Fill in the center and tap it slightly flat with a fingertip after touching it to the dusting pouch.
 Repeat two more times, or however many times it takes until you no longer need to fill in a center because the sides are touching each other. You might end up with just enough room to pipe a single center line to finish the pumpkin off.
 Attach the #83 tip to the brown icing, hold it against the surface, and pipe a stem. I prefer long stems on pumpkins, but long, freestanding lengths of royal icing are susceptible to breakage so this stem is only a few millimeters long. When you stop pressure and pull the tip away, you may want to flatten the end of the stem with a dusted fingertip.
 When the icing is firmed up, peel away the parchment and use this pumpkin to decorate any dessert. You can make it in any size by varying the size of the round tip and substituting another round tip for a proportionate stem (I'm not aware of the quatrefoil-shaped tip being available in more than one size). You could also use a large round tip to pipe this pumpkin directly onto a cupcake with buttercream icing.

Sunday, October 21, 2012

Royal Icing Monster High Skullette Logo

My most-read post is still the Monster High cake from February! Is it any wonder; Monster High is the most freakishly fab phenomenon ever! For those who need some boning up on the subject, the official logo of Monster High is called a Skullette: 

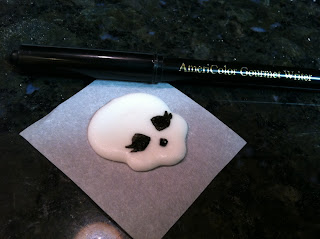
I thought it would be fun to try piping Skullettes out of royal icing, which could then be used to decorate cupcakes, borders on larger cakes, etc. All you'll need are stiff consistency white royal icing, round tip #12, a glue stick, a flower nail, parchment paper squares, a Styrofoam block, a dusting pouch filled with a 50/50 mix of cornstarch and powdered sugar, and a black food-safe marker (like the AmeriColor Gourmet Writer). You'll also need some pre-made royal icing bows in hot pink, piped with an oval #57 tip. 
Start by sticking a parchment square to the flower nail with a dab from the glue stick. 
 Hold the #12 tip just above and at a right angle to the surface and pipe an oval.
 Underneath the oval pipe a slightly curved line…
 …and then pipe a dab about 1/3 the width of the line.
 Liberally dust a fingertip by tapping it to the dusting pouch, and then tap it on the icing to blend it together and fill in the hole in the oval. Allow the icing to dry until the surface is very hard.
 Using the above logo as a guide, draw in the face with the food-safe marker.
 Lastly, glue a bow to the right side of the skull at an angle with a dot of icing. Fangtastic!

Saturday, October 20, 2012

Royal Icing Spider Cupcake

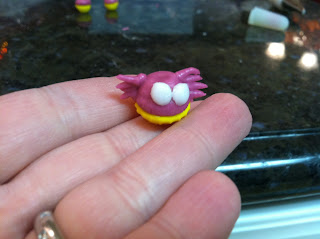
Tonight's tiny little spider cupcake was inspired by the one that comes with the Monster High Coffin Bean playset:
It's made in a similar way to the royal icing blueberry muffin. Stick a parchment square to a flower nail with a dab from a glue stick, pipe a dollop of stiff consistency royal icing in any color with a #199 star tip, stop pressure and pull the tip away… 
 …then tap the peak flat with a fingertip after touching it to a dusting pouch filled with a 50/50 mix of powdered sugar and cornstarch.
 Pipe as many as you can on the same parchment square. When they're completely firmed up, peel away the parchment.
Now it's time for the spider part! Pipe a ball of stiff consistency royal icing in any color with a #12 round tip. 
 Allow it to firm up for a while, then pipe four legs on one side with a #3 round tip. Hold the tip against the surface, squeeze while pulling the tip away for a few millimeters, then stop pressure and pull the tip away. Repeat on the other side.
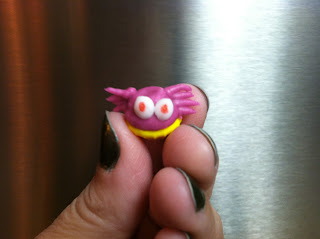
 Pipe the eyes with an oval #57 tip. Hold the tip slightly off the surface, squeeze out an oval-shaped dot of icing, stop pressure and pull the tip away. Tap down a peak, if it remains, with a dusted fingertip.
 When the eyes are dry, give them some pupils with a food-safe marker like AmeriColor Gourmet Writers. These would look really cute in a scene inside a "panoramic egg" eyeball!