I can't believe it's been a year since I wrote these two sentences: "My New Year's Resolution is to attempt to master as many cake decorating skills as possible, and to share what I learn here. I have a wild idea that I might be able to come up with 365 posts by this time next year." When I wrote that I was being pretty serious; I rarely come up with resolutions I don't think I can stick to, because in my mind a resolution is like a Lenten vow that lasts for at least a year (which is why you'll never hear me resolving to give up caffeine or be asleep by midnight every night or some other impossible goal that I'll fail at by January 2nd).
When I started this blog, I made a little side-bet with myself that I'd post something, ANYTHING, by midnight every day, which I'm sure was annoying to my subscribers, who probably got used to posts that read something like "Sorry today's post is all photos; I SWEAR I'll write in the instructions later." That gum paste Easter lily I was working on during the thunderstorm haunts me to this day; I STILL haven't written the directions to that one, but I figure I have a couple months before people start bugging me for them (I'll have to check the calendar to see when Easter is in 2013). I'm dreading that a bit, because I haven't worked with gum paste in FOREVER. I got kind of burned out on gum paste. I don't care what you've heard about it being edible; it tastes vile and has a revulsive consistency. I think for a thing to be considered edible it has to at least be palatable as well (and how that stuff earned the Kosher symbol is beyond me).
If you've followed along with this blog for any amount of time, you've probably noticed that once I got into royal icing, I never looked back. I thought of my nearly exclusive focus on royal icing like this: if you want to learn how to make things out of gum paste and fondant, head for Amazon and pick up any one of the gazillion books on those substances or watch any episode of Cake Boss or America's Next Great Baker; just watch and learn (almost every project/challenge has SOMETHING to do with fondant). If you want to learn how to do tricky things with royal icing, stalk my blog for an hour; surely you'll find SOMETHING to do with that huge Tupperware tub of icing left over from your Wilton class. I still haven't given up on the dream of someday publishing a book on royal icing; I'm hoping the title will be something descriptive like Easy Royal Icing Projects, as opposed to Eddie Spence's book which might as well be titled Insanely Challenging Royal Icing Projects (don't get me wrong; I love this inspiring book, but can't imagine ever being competent enough to attempt half the things in it. Oh, and that link will probably be stale in about a day, because it's out of print and only available on Amazon Marketplace right now, sometimes for as much as $500). So, here's my plea: if any of you "know somebody" who might be able to help me turn this blog into a book, please write me!
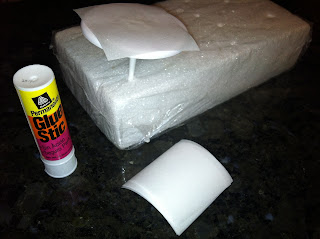
Here's what's next for The Iced Queen (both the blog and the person): a sizable break. As I think of new projects or acquire new skills, I'll certainly blog about them (I'm keeping the sweet domain name theicedqueen.com forever; if you found this post because you're trying to buy it, move on; I doubt you could afford the amount I'd surrender it for). I might add a little more to this post, if I think of an anecdote or two that should have been here. I actually really feel melancholy right now; this is the first evening in months that hasn't involved me sticking "a square of parchment paper to the flower nail with a dab from the glue stick"; my dusting pouch is probably wondering where I am. Anyway, I want to thank you for visiting this blog; I'm grateful to you whether you read one post or 300.
Happy New Year!
XO, Denise
Monday, December 31, 2012
Sunday, December 30, 2012
Royal Icing Orchid
I don't blame you if your initial reaction to this post is "That doesn't look like an orchid." Well, since there are as many as 26,049 currently accepted species, I picked this one at random. All you'll need to pipe a basic white orchid is stiff consistency royal icing, a petal tip #104, a flower nail, a glue stick, parchment paper squares, a Styrofoam brick to rest the nail in, and a dusting pouch filled with a 50/50 blend of cornstarch and powdered sugar. Start by sticking a parchment square to the flower nail with a dab from the glue stick.
Hold the petal tip with the wide end touching the center of the surface and the narrow end angled outward and upward. Pipe while moving the tip in an upside-down "U" motion. Finish by drawing the tip back toward the center, stopping pressure and pulling the tip away.Repeat twice for a triad of petals. Taper the ends (especially of the bottom two) with your fingertips after touching them to the dusting pouch.
Pipe the two side petals. Again, keep the wide side of the tip in the center with the narrow side facing outward and upward. Really allow the icing to fan out in a circular fashion with these two side petals. Here's one…
…and the other. Allow them to firm up for a bit.
I practiced the final petal on my fingertip quite a few times; yummy, yummy practice! Hold the tip with the wide side in the center of the flower and the narrow side of the tip angled sharply upward. Pipe a bowl-shaped petal with the ends meeting in the center. Here's a side view of it…
…and here's a view straight on. When the icing is dry you can brush on some color dust or petal dust. Place several of them in a wreath on a cake and you'll have a lei!
Saturday, December 29, 2012
Royal Icing Flamingo OR Swan
I had a hard time naming this post, because the above photo looks like a mashup of a flamingo AND a swan. I would have called it "flamingo" except I forgot to hook the beak over, and I would have called it "swan" if it was white. With some minor adjustments, you can pipe either one with just a few simple tools. You'll need a round #12 tip, an oval #55 tip, white or pink stiff consistency royal icing, a glue stick, a flower nail, a Styrofoam block, parchment paper squares, a dusting pouch filled with a 50/50 mix of powdered sugar and cornstarch, round toothpicks, and black food coloring like AmeriColor's Soft Gel Paste. Start by sticking a parchment square to the flower nail with a dab from the glue stick.
Hold the #12 tip just above and at a 45 degree angle to the surface. Squeeze out a ball, then move it along while decreasing pressure to form a teardrop shape. Stop pressure and pull the tip away. Touch your fingertips to the dusting pouch and adjust the shape of the icing with them if need be.On a second piece of parchment, pipe a shape like a question mark for the head and neck. Add a little extra shot of icing to the top for the head, then blend the icing with a dusted fingertip.
Allow the icing to firm completely, then attach the head to the body at the base of the neck with a small amount of icing from the #55 tip.
Add dots of black food coloring for eyes with the tip of a round toothpick that you've smashed against the countertop to give it a flat end. Pipe these in pairs for a very cute Valentine's Day cupcake topper (or an homage to John Waters' Pink Flamingos).
Friday, December 28, 2012
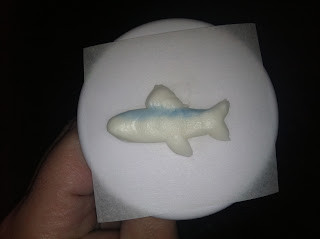
Royal Icing Sardines
A couple years ago I produced a production of the play "Noises Off," which heavily features sardines. If only I'd known how to make these then; what a cute decoration for cast party cupcakes these would have been. All you'll need to pipe sardines, (or, as my husband observed, airplanes), are white stiff consistency royal icing, oval tip #55, round tips #12 and #5, petal tip #101, a flower nail, a glue stick, parchment paper squares, a Styrofoam block to rest the nail in, a dusting pouch filled with a 50/50 mix of powdered sugar and cornstarch, periwinkle Color Dust, silver Pearl Dust, soft decorating brushes, round toothpicks, and black food coloring like AmeriColor Soft Gel Paste. Start by sticking a parchment square to the flower nail with a dab from the glue stick.
Hold the #12 tip just above and at a right angle to the surface. Squeeze while moving the tip along for about 1.25".Touch your fingertips to the dusting pouch and use them to taper the ends.
Switch to the #55 tip and squeeze out two short bursts of icing for the tail.
Switch to the #101 tip to pipe the fins on the top and bottom. You might want to practice these on a fingertip first; they're a little hard to explain, but as long as they're more or less the shape of fins your fish should look more like a fish and less like a plane.
Allow the icing to firm up for a few minutes, then apply some of the periwinkle dust along the back with a decorating brush.
Dust the fish completely with the silver dust.
Pipe a dot of icing for the eye with the #5 tip and flatten it slightly with a dusted fingertip.
Paint a line of black dots of food coloring along the body with the pointy end of a toothpick (just dab the toothpick; go easy or you'll pierce the icing).
Smash the other end of the toothpick against the countertop and use it to dab in the pupil of the eye when the icing is fairly hard. Good luck convincing folks that these merely LOOK like sardines; the resemblance does not extend to the taste!
Thursday, December 27, 2012
Royal Icing Polar Bears
The main trick when piping a royal icing bear is doing everything you can to make it NOT look like a royal icing mouse! You'll need white stiff consistency royal icing, round tips #12 and #3, oval tip #55, a flower nail, parchment paper squares, a glue stick, a Styrofoam block to rest the nail in, a dusting pouch filled with a 50/50 mix of powdered sugar and cornstarch, flat toothpicks, and black paste food coloring, like AmeriColor Soft Gel Paste. Start by sticking a parchment square to the flower nail with a dab from the glue stick.
Hold the #12 tip just above and at a 45 degree angle to the surface. Squeeze out a ball, then move the tip upward and to one side. Stop pressure and pull the tip away. Touch your fingertips to the dusting pouch then use them to perfect the shape of the upturned nose, if need be.Allow the icing to firm up for a few minutes, then switch to the #3 tip to pipe the ears, which are tiny little "c" shapes. Don't make them too big, or the bear will look mouselike!
Switch to the #55 tip to pipe the legs, which are short shots of icing. Adjust with your dusted fingertips as needed.
Paint on the eyes and nose with the end of a flat toothpick. Make sure the features are more oval than round so your creatures will look more like bears than mice! They would look adorable perched on a winter-themed cupcake or some other small dessert.
Wednesday, December 26, 2012
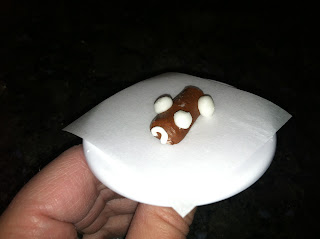
Royal Icing Yule Log
Tonight's post is a ridiculously tiny Yule log; it's not even a Yule stick! If you'd like to see the other time I ventured into this type of thing, check out my Yule Stump (it has links to all the various elements like meringue toadstools and royal icing pine cones and needles). This mini Yule log starts life as a Royal Icing Ho-Ho; basically an inch-long line of brown icing piped from a #12 round tip, with a spiral of white icing piped at both ends with a #2 tip.
Pipe the mushroom caps with white icing and a #8 tip. Flatten them slightly with a fingertip after touching it to a dusting pouch filled with a 50/50 mix of powdered sugar and cornstarch.Sprinkle them lightly with cocoa powder.
Pipe a few tiny green leaves with a #65 tip.
Add a few red berries with a #3 round tip.
Lastly, sprinkle some "snow" from your dusting pouch. A perfect dessert for your gingerbread family or perched atop a cupcake or petits fours!
Tuesday, December 25, 2012
Royal Icing Ribbon Candy
Tonight's post is, like yesterday's, short and sweet; attention to Christmas details has definitely pushed the attention I can pay to my blog to the back seat! One of my favorite candies to decorate gingerbread houses with is ribbon candy, but it always gets so unappetizingly sticky. When you live in a damp climate, ribbon candy sometimes actually comes out of the bag in one giant piece. You can pipe your own rock-hard version with royal icing that should last indefinitely. All you'll need is flat, chiseled tip #150, a flower nail, parchment paper squares, a Styrofoam block to rest the nail in, a glue stick, and a dusting pouch filled with a 50/50 mix of powdered sugar and cornstarch. Start by sticking a parchment square to the flower nail with a dab from the glue stick.
Hold the tip so the opening is straight up and down with one side touching the surface. Squeeze steadily while rotating the nail back and forth AND holding the nail at about a 45 degree angle; the angle is what will give the rows of loops down the sides that open, teardrop shape. As you go into piping these loops, increase your pressure slightly so the icing will fan out. All of this action is necessary, or the icing will just zigzag back and forth in a rather flat, unsatisfying way.Of course, you could stripe the icing in the same way you stripe icing for piping roses; put a few stripes of different colors in there! I hope you had a lovely Christmas, if that's what you were celebrating today.
Subscribe to:
Comments (Atom)


