Friday, August 24, 2012

Royal Icing Key Lime Pie

Tonight's project is a tiny little key lime pie, which is the official state pie of Florida. All you need to pipe a ridiculously diminutive pie is stiff consistency royal icing in white, brown, and green (to represent the pie pan; might as well keep the color thematic with the pie's interior), a glue stick, parchment paper squares, a flower nail, a Styrofoam block to rest the nail in, and a dusting pouch filled with a 50/50 blend of cornstarch and powdered sugar. You'll also need round tips #12 and #4 and star tip #16. Start by sticking a parchment square to the nail with a dab from the glue stick. 
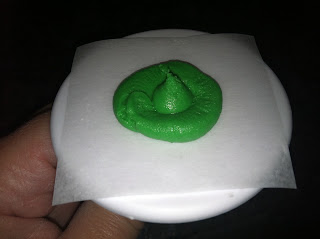
 Holding the #12 tip at a right angle to and just above the surface, pipe a ring about 1" across. Fill the center of the ring with a dollop of icing…
 …and touch a fingertip to the dusting pouch. Gently tap this shape flat into a disc. Allow it to firm up for at least 10 minutes.
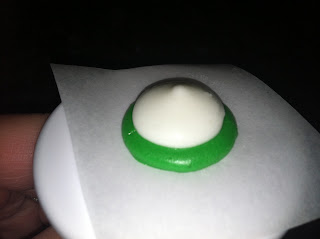
 Using the same or a different #12 tip, pipe a "kiss" of white icing in the middle of the disc. Hold the tip about a quarter-inch above the disc, squeeze out a nickel-sized dollop, then stop pressure and pull the tip away. A peak should remain.
 Pipe a #4 squiggly line of brown icing around the edge to represent the crust. You could stop here…
 …or switch to the #16 star tip to pipe an iconic meringue topping. These would be very cute as toppers on key lime cupcakes, or any other lime or Florida-themed dessert.

Thursday, August 23, 2012

Royal Icing Dahlia

Today's post is a bit of a departure from the "state symbol series", in that the dahlia isn't an official state flower. It is, however, the official flower of San Francisco, which is where my husband Bill and I got married 9 years ago today (and it was also our official wedding flower; fortunately, dahlias are common as dirt in August so we went a little crazy with them). Dahlias come in every size, petal shape, and color imaginable (except blue), so this one I piped today is sort of a typical specimen; it's not meant to depict any specific variety. Dahlias are a great excuse to use up a surplus of almost any imaginable icing color you may have lying around; in this case, I used some leftover fuchsia from Monday's wild prairie rose. You'll need a chrysanthemum tip like #79 by Magic Tip, a flower nail, a Styrofoam brick to rest the nail in, a glue stick, parchment paper squares, and a dusting pouch filled with a 50/50 blend of powdered sugar and cornstarch. You might want to use a larger flower nail and larger parchment squares, if you're attempting dahlias of the "dinner plate" variety. Start by sticking a parchment square to the nail with a dab from the glue stick. 
Starting in the center, pipe an inch of icing with the #79 tip. Stop pressure and pull the tip away. 
 Touch your fingertips to the dusting pouch, and pinch the outer edge of the petal to taper it.
 Here's another view of the same petal.
 I like to pipe "compass points" to keep the flower centered, overlapping in the center.
 Repeat…
 …and repeat.
 Finish off with a few petals in the center that are angled more up than out. Allow this flower a good amount of time to dry before peeling away the parchment paper. Dahlias are also the national flower of Mexico, so consider them next time you make a cake or other dessert for a fiesta of any sort!


Wednesday, August 22, 2012

Royal Icing Mistletoe

Let me start this post by letting you in on a useless piece of information: I'm blogging from the same hotel room where I did my first "remote post" back on January 2 (Road Trip Cupcakes). So if the hideous faux burl table looks familiar, that's why. Imagine my astonishment to learn that mistletoe is Oklahoma's official state floral symbol. I thought it would be amusing to serve up a batch of cupcakes this Christmas that are decorated with this poisonous parasite; I wonder if anyone would actually be hesitant to eat them? To honor Oklahoma by piping a crop of its oldest state symbol (actually adopted 14 years prior to Oklahoma's statehood), you'll need stiff consistency royal icing in green and white, two #8 round tips, petal tip #104, a glue stick, parchment paper squares, a flower nail, a Styrofoam block to rest the nail in, and a dusting pouch filled with a 50/50 blend of cornstarch and powdered sugar. Start by sticking a parchment square to the nail with a dab from the glue stick. 
 Attach one of the #8 tips to the bag of green icing (you'll want to use a coupler). Pipe a few branches, allowing them to touch each other securely; you might want to touch a fingertip to the dusting pouch and gently tap the branches together where they join.
 Switch to the #104 petal tip and pipe a few round leaves. Hold the wide side of the tip against the "branch" and rotate the narrow end of the tip around in a fan-like shape while piping steadily. Stop pressure and pull the tip away towards yourself when you've reached the end of the "fan." Neaten the edges with a dusted fingertip if you need to.
 Lastly, pipe the berries with the other #8 tip. Hold the tip just above the surface, squeeze briefly, then stop pressure and pull the tip away. If a peak remains, tap it down with a dusted fingertip to form a ball. I tried to pipe a berry or two at any place on the structure that I perceived to be a weak point. When the icing is completely dry, peel away the parchment paper. I can't guarantee this creation will have the same magical kissing effect of the real deal, but I'm about to find out.

Tuesday, August 21, 2012

Royal Icing Yellow Hibiscus

Hawaii's official state flower is the yellow hibiscus (additionally, each individual island has its own official flower). Several varieties exist with red in various places, but the one I'm doing is primarily yellow with red dots in the middle (I'm guessing they're stamens). All you'll need to pipe yellow hibiscus flowers are stiff consistency royal icing (in yellow, of course; I used Lemon Yellow Soft Gel Paste by AmeriColor), tip #104, tip #5, a glue stick, a flower nail, parchment paper squares, a Styrofoam block to rest the nail in, and a dusting pouch filled with a 50/50 blend of powdered sugar and cornstarch. You'll also need round toothpicks and AmeriColor's Super Red to make the dots that represent the stamens. Use a 5-petal flower nail template if it helps you to keep the petals even. 
 Pipe the first petal by holding the #104 tip almost flat against the surface. Keep the wide side of the petal tip against the center while gently waving the outer edge (the narrow side of the tip) up and down to form the grooves as you pipe.
 Pipe slowly and allow the icing to build up as you go; that will cause the icing to "ruffle" (instead of being flat like a rose petal).
 Pipe each petal in the same way, allowing them to overlap slightly. Here's the second:
 And the third:
 The fourth:
 And the fifth:
 Here's a side view. I love the dimensionality of this flower!
 Switch to the #5 round tip, hold it against the center, squeeze and pull up slowly. When the center is about half an inch tall, stop pressure and pull the tip away. Touch a fingertip to the dusting pouch and tap it against this formation to straighten it upright, if need be.
Lastly, when the flower has dried, use the pointy end of a round toothpick to paint the red dots of food color in the center. Aloha! 

Monday, August 20, 2012

Royal Icing Wild Prairie Rose

The wild prairie rose, Iowa's state flower since 1897, is found throughout the state, where it blooms from June through late summer. It comes in many shades of pink; I thought this would be a good excuse to try Fuchsia Soft Gel Paste by AmeriColor; it has a raspberry sherbet quality. You'll also need yellow stiff consistency royal icing, petal tip #104, round tip #2, parchment paper squares, a glue stick, a flower nail, a Styrofoam brick to rest the nail in, and a dusting pouch filled with a 50/50 mix of cornstarch and powdered sugar. You may find using a primrose template decal on the nail will help keep your petals equal in size. Start by sticking a parchment square to the nail with a dab from the glue stick. 
 Using the #104 petal tip with the wide side in the middle of the nail, almost flat on the surface, and the narrow side facing outward and angled slightly upward, pipe a heart-shaped petal. Squeeze slowly while moving your hand in a motion similar to a "3" lying with the curves up. Stop pressure and pull the tip away towards yourself when you reach the end of the shape.
 Pipe another petal, overlapping the first one slightly.
 You don't need to pipe the petals overlapping one after the other. I piped one opposite the first two just to mix things up…
 …and then the fourth…
 …and the fifth. Touch a fingertip to the dusting pouch and gently tap the center flat.
 Use the #2 tip to pipe a cluster of yellow stand-up dots for stamens. Hold the tip against the surface, squeeze while pulling the tip up and away for about 1/4", then stop pressure and pull the tip away. With their heart-shaped petals, wild prairies roses would be cute on a Valentine's Day dessert.


Sunday, August 19, 2012

Royal Icing White Trillium

Tonight's state-ly shout-out is to Ohio, for which the white trillium is the state wildflower. This three-petaled flower is also known as the wake robin or the snow trillium. As you can imagine, it's quite easy to pipe; perfect for that last bit of icing (and even better if you don't feel like dealing with a whole bunch of colors and tips). You'll need a petal tip #104, round tip #2, a dusting pouch filled with a 50/50 blend of cornstarch and powdered sugar, a flower nail, a Styrofoam block to rest the nail in, a glue stick, parchment paper squares, and stiff consistency royal icing in white and yellow. Start by sticking a parchment square to the flower nail with a dab from the glue stick. 
 Use the #104 tip to pipe a petal. Keep the wide side of the tip in the center, and undulate the narrow end up and down while you slowly pipe out a fan-shaped petal. Stop pressure and pull the tip away toward yourself.
 Touch your thumb and forefinger to the dusting pouch and pinch the edges of the petal so the shape is tapered to a point in the center.
 Repeat, allowing the second petal to overlap slightly toward the middle…
 …and repeat one more time for the third petal. You may find that working with a template decal on the nail under the parchment will help keep your three petals equal, but I think you'll be able to do this with practice (you should have seen my first effort for this flower; a total toss-out!).
 Finally, pipe a cluster of #2 stamens in the middle. Hold the tip against the surface, squeeze while pulling the tip upwards a short distance, then stop pressure and pull the tip away. Adjust the angles of the stamens with a dusted fingertip if you need to. Don't worry if they aren't all the exact same height; randomness keeps it real!

Saturday, August 18, 2012

Royal Icing Manatees

Tonight's post is the official state marine mammal of Alabama: The West Indian Manatee. This is also the first project I've ever done that features gray icing, which of course makes me think of that line from Steel Magnolias regarding the armadillo grooms' cake, "I can't even think how you make gray icing!" Probably obviously, you add a very small amount of a black paste coloring to white icing; I used AmeriColor Soft Gel Paste in Super Black. In addition to stiff consistency royal icing, you'll need round tip #12, petal tip #101, oval tip #57, round and flat toothpicks (to draw on the features with the black food coloring), a flower nail, a Styrofoam block to rest the nail in, parchment paper squares, a glue stick, and a dusting pouch filled with a 50/50 mix of cornstarch and powdered sugar. Start by piping the manatee's head and body, which bear a strong resemblance to a shapeless blob of icing. Stick a parchment paper square to the flower nail with a dab from the glue stick. Holding the #12 tip at a 45 degree angle to the surface, pipe a ball using gentle pressure, then increase pressure to create a body larger than the head, and then slowly decrease and eventually stop pressure as you move the tip about 3/4" across the nail. 
 Touch your thumb and forefinger to the dusting pouch and gently pinch the head into almost a dog (or maybe hippo) shape.
 Switch to the #101 petal tip and pipe the paddle-shaped tail. Aim the wide side of the tip outward, and pipe a shape slightly smaller than a semi-circle, overlapping the body so the tail will hold securely.
 Switch to the #57 oval tip and pipe the flippers. Hold the tip against the body, and make sure they are firmly adhered to the body by tapping the part where they attach with a dusted fingertip. Pipe a curved "L" shape; stop pressure and pull the tip away when you reach the end. Touch a fingertip to the dusting pouch and tap the ends to neaten them.
Lastly, when the icing has firmed up, give this little fellow (or lady) a face by dipping the tips of toothpicks into black paste food coloring. I used a round toothpick to paint the eyes (I smashed the tip against the countertop first so it wouldn't be quite so pointy), and I used the small end of a flat toothpick to paint in the nostrils. Allow the manatee to dry, and then kiss it on its little head; you know you want to.