Showing posts with label tip #3. Show all posts

Sunday, December 23, 2012

Royal Icing Bunny Slippers

Tonight's post is an homage to "A Christmas Story"; how many of you list that among your favorite holiday films? All you'll need to pipe tiny little bunny slippers just like Ralphie's are stiff consistency royal icing in pink, round tip #12, leaf tip #352, a flower nail, parchment paper squares, a glue stick, a Styrofoam block to rest the nail in, a dusting pouch filled with a 50/50 mix of powdered sugar and cornstarch, round toothpicks, and black food coloring, like AmeriColor's Soft Gel Paste. Start by sticking a parchment square to the flower nail with a dab from the glue stick. 
 Hold the #12 tip just above and at a right angle to the surface. Pipe out a couple of elongated "bean" shapes, curving slightly in the middle and with the ends wider than the center. Touch your fingertip to the dusting pouch and then finesse the icing into shape, if need be. Allow these shapes to firm up for a few minutes.
 Hold the tip at a 45 degree angle and just above and behind one of the ends. Squeeze out a ball of icing, then move the tip along for a few millimeters. Stop pressure and pull the tip away.
 Tap down the peaks with a dusted fingertip. Allow the icing to firm up for a few minutes.
 Hold the #352 tip against the head (with one of the pointy sides facing toward the front of the slipper) and pipe out an ear while moving the tip upward for about half an inch. Stop pressure and pull the tip away. Use a dusted fingertip to adjust the ears so they lop over.
 Pipe the eyes with #3 dots of white icing. Flatten them slightly with a dusted fingertip.
 When the white icing is firm, dab on pupils of black food coloring with the tip of a round toothpick that you've smashed against your countertop.
 Paint on a tiny triangular nose with the other pointy end of the toothpick. Sorry; tomorrow's tutorial won't be for a leg lamp or a Red Ryder BB Gun!

Thursday, December 13, 2012

Royal Icing Spiral Candy

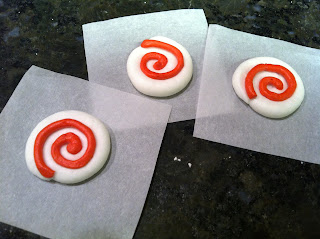
I'm not quite sure what to call this creation; spiral candy seems pretty descriptive. Basically, I was looking for an alternative to hard candy that will eventually become sticky when used to decorate gingerbread houses or cookies; royal icing will stay rock hard. You'll need stiff consistency royal icing in any colors you like, parchment paper squares, a flower nail, a glue stick, a Styrofoam block to rest the nail in, and a dusting pouch filled with a 50/50 mix of powdered sugar and cornstarch. You can use tips in any size depending on how large you want your "candies" to be (I used #10 and #3). Start by sticking a parchment square to the flower nail with a dab from the glue stick. 
 Hold the larger tip just above and at a right angle to the center of the nail. Rotate the nail while steadily piping a spiral. When you get to the end (the size you want), stop pressure and pull the tip away. Touch a fingertip to the dusting pouch and tap down the end to neaten it and taper it into the spiral.
 Allow the icing to firm up for a few minutes, then pipe a spiral with the smaller tip and a contrasting color. When the icing is firm, peel away the parchment and use them to decorate anything you like. Alternately, pipe them in brown with a white spiral and, Voila! Cinnamon buns!

Sunday, December 9, 2012

Royal Icing Poinsettia

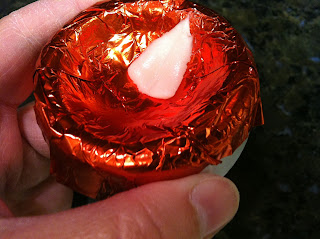
Poinsettias are very easy to pipe, but they take a long time to dry; make sure to plan ahead if you're going to use them to decorate a cake for Christmas! You'll need stiff consistency royal icing in green, yellow, red or white, leaf tip #70, round tips #2 and #3, and a dusting pouch filled with a 50/50 mix of powdered sugar and cornstarch. You'll also need a small flower forming cup and a square of candy foil for each poinsettia. 
 Line the cup with the foil and tuck it around underneath.
 Attach the #70 tip to the white or red icing. Hold the tip in the center and squeeze out a petal.Touch your fingertips to the dusting pouch and taper the tip of the petal.
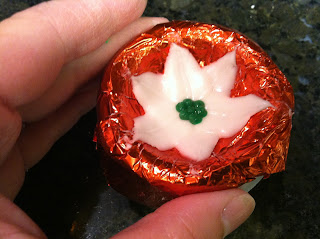
 Repeat several times to make the flower. I like to start by piping three equilateral petals. Try not to pipe an excessive amount of icing in the center or it will take a week to dry, depending on your climate.
 Six petals or so is a good number.
 Pipe a cluster of green dots in the center with the #3 tip.
 Allow the green dots to dry for a few minutes, then top each one with a dot of yellow piped from the #2 tip. You can gently remove the flower on the foil from the cup so you can use the cup to pipe more flowers. Set the foil with the flower on it aside in a warm, dry location. Don't peel away the foil until the icing is completely dry.

Saturday, December 8, 2012

Royal Icing Waffle

Continuing with the breakfast theme of yesterday's pancakes, today's waffle is another example of something that's cute and fun to do with that last little bit of icing (but it's probably something you'll never need to actually know how to do). You'll need yellow stiff consistency royal icing, round tips #12 and #3, oval tip #55, a flower nail, a glue stick, parchment paper squares, a Styrofoam block to rest the nail in, and a dusting pouch filled with a 50/50 mix of powdered sugar and cornstarch. Start by sticking a parchment square to the flower nail with a dab from the glue stick. 
 Hold the #12 tip at a right angle to and just above the surface and pipe a circle about the size of a nickel. Touch a fingertip to the dusting pouch and flatten the icing into a disc. Allow this shape to dry for a few minutes.
 Switch to the #3 tip and pipe a few lines in one direction, allowing a tip's width between them…
 …and then pipe lines in the other direction. Flatten the lines slightly with a dusted fingertip.
 Switch to the oval #55 tip and pipe a border around the edge, with one of the narrow sides of the tip facing down. Perhaps a tiny waffle would be a good garnish on a maple-flavored dessert like a cake pop or muffin.

Thursday, December 6, 2012

Royal Icing Gingerbread Man

Perhaps this is a good variation on gingerbread cookies for folks who have gluten sensitivity; why not make the whole cookie out of royal icing, not just the decorations? You'll need brown stiff consistency royal icing (along with white and any other colors you like), round tips #12, #10, and #3, a flower nail, a glue stick, parchment paper squares, a Styrofoam block to rest the nail in, and a dusting pouch filled with a 50/50 mix of powdered sugar and cornstarch. Start by sticking a parchment square to the flower nail with a dab from the glue stick. 
 Hold the #12 tip just above and at a right angle to the surface. Pipe a circle for the head, and a "U" shape for the body. Touch a fingertip to the dusting pouch and tap the icing flat and smooth.
 Switch to the #10 tip to pipe the arms and legs. Again, keep the tip at a 90 degree angle and just above the surface. Overlap the limbs onto the body a little bit and tap the surface smooth.
 Allow the icing to dry for several minutes, and decorate it any way you like with whichever size tips you like using. You could pipe a whole family to live in a gingerbread house!

Tuesday, December 4, 2012

Royal Icing Hanukkah Gelt

This time of year, chocolate gelt is pretty easy to come by. However, it isn't the greatest thing to decorate cupcakes with, and folks who are allergic to chocolate need to give it a miss. For an alternative, try piping gelt with royal icing. You'll need stiff consistency royal icing in yellow, round tips #12 and #2, a flower nail, parchment paper squares, a glue stick, a Styrofoam block to rest the nail in, and a dusting pouch filled with a 50/50 mix of powdered sugar and cornstarch. Start by sticking a parchment square to the flower nail with a dab from the glue stick .
 Hold the #12 tip at a right angle to and just above the surface. Pipe a ring; decrease pressure as the ends overlap and pull the tip away.
 Pipe a dollop of icing in the center hole.
 Touch a fingertip to the dusting pouch and tap the icing flat into a disc.
 You can make them in a variety of sizes; the largest one here is just over 1". Allow the icing to firm up for about 20 minutes.
 Use small round tips like the #3 to pipe designs on them. To create the "interlocking" effect on the Star of David, pipe three pairs of parallel lines.
 To keep the menorah balanced, I piped the center line, then the base, then the three curving lines, starting from the center and working my way outward. The "flames" are small shots of icing that end in a point from stopping pressure and pulling the tip away.
 This gelt might not be sturdy enough to withstand an actual game of dreidel, but they'll certainly look good decorating any dessert.

Saturday, December 1, 2012

Royal Icing Christmas Pudding

Today's post is short and sweet (and tiny and sweet, too). You can make doll-sized Christmas puddings with round tips #12 and #3, leaf tip #65, stiff consistency royal icing in brown, green, and red, parchment paper squares, and a dusting pouch filled with a 50/50 mix of powdered sugar and cornstarch. Start with the #12 tip on the brown icing. Hold the tip just above and at a right angle to a parchment square. Squeeze out a dollop of icing; move the tip upwards as you squeeze for about half an inch. Stop pressure and pull the tip away. Touch a fingertip to the dusting pouch and tap down the peak. Allow this shape to dry for about 15 minutes. 
 Pipe a green leaf or two with the #65 tip.
 Finish off with a cluster of #3 dots for berries. This could be a cute garnish for any small Christmas-themed dessert like cupcakes or petits fours.

Saturday, November 24, 2012

Royal Icing Holly and Berries

If you have leftover red and green icing from making wreaths, why not pipe some holly? All you'll need is leaf tip #70, round tip #3, a flower nail, a Styrofoam block to rest the nail in, a glue stick, parchment paper squares, round toothpicks, and a dusting pouch filled with a 50/50 mix of powdered sugar and cornstarch. Start by sticking a parchment square to the flower nail with a dab from the glue stick. 
 Attach the leaf tip to the bag of green icing. Lay the tip almost flat against the surface and pipe for about 1". Stop pressure and pull the tip away. Touch your fingertips to the dusting pouch and define the end of the leaf into a point.
 Press a round toothpick into the icing all the way around the edge of the leaf (except the tip), drawing it outwards as you pull it away.
 Pipe a cluster of red berries with the #3 tip. Hold the tip just above the surface, squeeze out a ball, and pull the tip away. Repeat, repeat. Tap down any peaks that remain with a dusted fingertip. These holly leaves would look great as a garnish on any dessert for Christmas.